


IC 443 - The Jellyfish Nebula Astrophotography | 100 hours

Updated: Sep 15
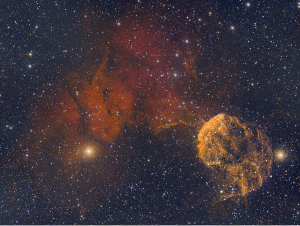
The Jellyfish Nebula appeared 30,000 to 35,000 years ago when a supernova occurred in our galaxy. IC 443 is a beautiful remnant of that explosion and has the shape of a jellyfish.
Although IC 443 is pretty challenging to image, it still has a spot in our guide to the 15 best targets to image in Spring. It is also visible during most of the Winter season and should be photographed then if you are not busy with all the other incredible Winter objects.
Object Designation: IC443, Sh2-248
Also known as: The Jellyfish Nebula
Constellation: Gemini
Object Type: Supernova Remnant
Distance: 5,000 light-years away
Magnitude: 12
Apparent Size: 50 x 40 arc-minutes
Discovered in: 1895 by Isaac Roberts
I have imaged this target more than once. You'll see each attempt below! In the northern hemisphere, the best time to photograph the Jellyfish Nebula is in late Winter to Spring.
Jellyfish Nebula Astrophotography with a Monochrome Camera in LRGB-HA
August 2026
6 years after my first attempt, I decided to image the Jellyfish Nebula again, but this time from a darker sky and with a larger refractor. I also decided to go nuts, and spend 100 hours on it! This took several months because I was only imaging it for a few hours a night due to other ongoing projects. In August, I was finally done and decided it was time to process it.

This shot was taken with my rig from Starfront Observatories, which is a remote observatory in the middle of Texas. I've had my SVX130 there since they opened, and have been enjoying all the clear nights so far!
We made a video about Starfront when we installed our equipment there if you want to learn more.
Starfront is growing very fast, and they're very affordable compared to most other remote observatories. Having been there for so long, I can honestly say that the experience has been awesome since Day 1 and that their support team is top notch!
For the processing, I tried to keep it as natural as possible, without fancy rainbow colors which are pretty common with this object. I might experiment with that later as it does look good also, but for now, I like it as is. The goal was mostly to keep the details intact and show the faint gas all around.
I think the result for this specific target would have been almost identical if I only spent 30-50 hours on it instead of 100 hours. But I just enjoy reaching 100 hours anyway, even if it makes no difference 😅
Click the picture to see it in full resolution!

Learn how to process your data like this with our PixInsight processing guides.
GEAR USED:
Camera: QHY600M
Telescope: Stellarvue SVX130
Mount: 10Micron GM1000 HPS
Accessories: Moonlite Nitecrawler focuser / Pegasus Astro Ultimate Powerbox
Processing: Pixinsight with RC-Astro plugins, final touches in Skylum Luminar Neo
ACQUISITION DETAILS:
Total Exposure Time: 100 hours
Exposure Time per frame: 10 minutes
Filters: Chroma 3nm R/G/B/H/O
Gain: 56
IC 443 Astrophotography with a Small Refractor Telescope
March 2020
This was my last time using the Meade 70mm APO telescope for the season. It is a very small instrument with a wide field of view.

Because it is now Spring season (also called Galaxy season), we would not have a need for it as it is too small for pretty much all galaxies visible in the sky. We can't wait for Summer to be here so that we can use this little guy again!
We aimed for 6 hours of exposure but only had time to do a little under 5 hours. Still, we are not very happy with the end result and wish we went back on a different night to double our data.
Below is our final image of the Jellyfish Nebula processed in SHO (Hubble Palette). Let us know what you think! Scroll down further to see an HSO (more red) version of this image.
We also have a video available on our YouTube channel where you can see how we got this target from beginning to end. Scroll down for more info.
IC 443 in narrowband using the Meade 70mm APO and the ZWO ASI 1600MM

GEAR USED:
Camera: ZWO ASI 1600MM
Telescope: Meade 70mm APO
Mount: Orion Atlas EQ-G
Guiding: ZWO ASI 290MM Mini
Acquisition: ZWO ASIAIR
Processing: Pixinsight
ACQUISITION DETAILS:
Total Exposure Time: 4.8 hours
Exposure Time per frame: 5 minutes
Filters: Ha (22)/Sii (18)/Oiii (18)
Gain: 139
How to find the Jellyfish Nebula?

The Jellyfish Nebula is way too faint to be visible with the unaided eye, but you may be able to roughly spot it using a pair of binoculars, only if you are in a location far from light pollution.
Small telescope should reveal the brightest part of the nebula, although the use of a filter is strongly recommended.
The Jellyfish nebula is located in the constellation Gemini and is pretty easy to find by using the star- hopping technique. If you are familiar with the shape of this constellation (2 human twins), then IC 443 can be found near the foot of Castor. If observing with binoculars, you might also spot the Messier cluster M35 in the same field of view!
Cool Facts about the Jellyfish Nebula
One of the most studied supernova remnants in the night sky
Located 5,000 light years away from Earth
Supernova created a Neutron Star within
Online Premium Astrophotography Course
Want to learn all aspects of astrophotography in the most efficient way possible?

Learn EVERYTHING about astrophotography with the Galactic Course! Check out the 1000+ lessons and get started on some of the free courses. Join thousands of other students, master you rig and stop wasting precious clear nights.
Processing of the Jellyfish Nebula
Written about the 2020 image
Processing the Jellyfish Nebula was more difficult than I anticipated. Although we had almost 5 hours of data, there was still some noise that was hard to get rid of throughout the image. I was also expecting more of the faint gas on the top and left side to be visible.
You can get our full PixInsight workflow HERE.
When stacking the filters together, I wasn't sure if I should process the Hubble Palette (SHO), or go another route with either OHS (left) or HSO (right) combinations. I decided to do both.

What did each narrowband channel look like?
Below you can see what each stacked frames looks like for each narrowband channel. We used three filters to capture the Jellyfish Nebula:
Hydrogen Alpha (left)
Sulfur II (center)
Oxygen III (right)
The Hydrogen Alpha is, as (almost) always, the filter that shows the most data. The Sulfur II filter only revealed some of the very faint detail on the outer edge of the Jellyfish.
Jellyfis Nebula Hydrogen Alpha Jellyfish Nebula Oxygen III
The Jellyfish Nebula in HSO and HOO
As mentioned earlier, I decided to not only process IC 443 in the Hubble Palette combination, but also in HSO. In this palette, Hydrogen Alpha is set to Red, Sulfur II is set to Green and Oxygen III is set to blue. In short, the difference between this and the Hubble Palette combination is that the Reds and Greens are switched.
You can see the result below!
On the right you can also see the 2026 version, which looks similar despite missing the Sulfur filter. The combination used for the 2026 picture was HOO.

IC 443 FAQ
In which constellation is IC 443 located?
You can find the Jellyfish Nebula in the constellation Gemini.
How big is IC 443?
The Jellyfish Nebula has a diameter of approximately 70 light-years. From Earth, it has an apparent size of 50 x 40 arc minutes.
How old is the Jellyfish Nebula?
IC 443 is between 30,000 and 35,000 years old.
How far is NGC 3293?
The Gem Cluster lies approximately 5,000 light-years away from Earth.
How long should my exposure times be when photographing IC 443?
This is faint nebula with a lot of details and nebulosity. I recommend doing as long as you can for each exposure! I did 600-second exposures, but do 1,200 seconds if you're sure your tracking and guiding are perfect and that there is no wind. Your signal to noise ratio will be great and the gasses should look good!
Should I use a filter to image the Jellyfish Nebula?
Yes! This is a great duoband target, and so you should use your HA and OIII filters. If you have an SII filter, feel free to also use that, but it doesn't have as much as the other two. Of course, use RGB filters for the stars.
If you don't own narrowband filters (or a duoband one), this is also a good target anyway! Just ensure to be under dark skies.
Our video about capturing the Jellyfish Nebula
If you'd like to learn more about how Antoine found a new place to image from and how he captured the Jellyfish Nebula with the Meade 70mm telescope, you can watch the video below!
Final Thoughts
The Jellyfish Nebula was trickier than I thought. I was expecting almost 5 hours of data to be more than enough from a Bortle 4 zone, but it appears that we should have doubled that amount to get a really nice image. We usually spend 3 hours of total exposure on most of our targets, but this Jellyfish does not like to be photographed that easy!
6 years later, spending 100 hours on it with new equipment and darker skies truly made a huge difference! I am much happier with the 2026 version, of course, as it looks more impressive and colorful.
Have you captured the Jellyfish Nebula? Attach your image in the comments and let us know your acquisition details!
Clear Skies,
Galactic Hunter
ASTROPHOTOGRAPHY TUTORIALS

DSLR Beginner Astrophotography Equipment tutorial, a complete guide on what to buy as a first telescope, camera for deep sky imaging, motorized mount, astrophotography accessories and softwares for processing and planning 
Switching from a DSLR camera to a CCD or CMOS cooled camera for Astrophotography, our 5 tips and tricks on things we wish we knew before imaging for the first time, Beginner Astrophotographer tutorial 
How to focus a Newtonian reflector telescope with a Bahtinov mask in seconds. Imaging deep sky objects in Astrophotography requires perfect focus, which can be achieved easily. Amateur astrophotography tutorial 
Astrophotography tutorial for PixInsight and Lightroom. How to stack deep sky images and process raw files from a DSLR camera and telescope
GALACTIC HUNTER BOOKS
Description: Discover 60 Deep Sky Objects that will considerably improve your Imaging and Processing skills! Whether you are a beginner, intermediate, or advanced astrophotographer, this detailed book of the best deep sky objects will serve as a personal guide for years to come! Discover which star clusters, nebulae, and galaxies are the easiest and most impressive to photograph for each season. Learn how to find each object in the night sky, and read our recommendations on imaging them in a quick and comprehensive way. Each target in this guide contains our advice on imaging, photos of expected results, and a useful information table. We've also included a few cool facts about each target, a map to find it in the night sky, and more!
Description: The Astrophotographer’s Journal is a portable notebook created for the purpose of recording observations, cataloguing photographs, and writing down the wonderful memories created by this hobby. This book contains more than 200 pages to memorialize your stargazing and imaging sessions, as well as a useful chart on the last pages to index exciting or important notes. Read back on the logs to see how much progress you have made through the months, the problems you overcame, and the notes taken to improve in the future. Just as the pioneers of astronomy did in their time, look up and take notes of your observations as you are the author of this star-filled journey.
Description: The Constellations Handbook is a logical guide to learning the 88 constellations. Learning the constellations is difficult. Remembering them is even harder. Have you ever wanted to look up to the night sky, name any pattern of stars and be able to tell their stories? This book groups the constellations in a logical order, so that the reader can easily learn them by their origin, and see how their stories interact with one another as a group. The last pages of this book include an index of all 88 constellations, each with a slot where you can write your own personal tips and tricks in order to memorize them with ease. The Constellations Handbook is not just another guide listing all the constellations from A to Z and their location, it is the perfect companion for stargazing, and a learning journey through the ages.


Comments