
How to attach any camera to a telescope for Astrophotography?
- Antoine & Dalia Grelin
- Dec 22, 2019
- 6 min read
Updated: Jun 6, 2023
One of the first questions beginner astrophotographers have after they purchased a telescope and a camera is how to connect them together!?
We remember when we were the ones looking for answer to this question. We watched a lot of videos on YouTube and read a lot of articles about how to attach a camera to a telescope. The main problem we encountered was that there is not just one way to attach the two together.

In this tutorial, we will use two different types of telescopes (a reflector and a refractor) and three different types of cameras (a DSLR, a One Shot Color cooled camera and a Monochrome cooled camera) to see how you would attach these together in a few different scenarios.
We will update this post with more different scenarios over time. Let us know in the comments if you have a specific request!
Scenario 1: Reflector Telescope and DSLR Camera


Let's pretend you got a Newtonian reflector telescope for Christmas, and would like to attach your DSLR camera to it so that you can start taking images of deep sky objects.
We'll be using our 8" Newtonian as our example here, with our Canon 7D Mark II DSLR camera.
First, you will need a T-Ring (left). This will allow you to screw in an adapter. You will need a specific adapter in order to connect the two, either a T-Mount Adapter (center) or a coma corrector (right). To know which one to purchase, look at the focal ratio of your telescope.


T-Mount adapter: If your telescope has a focal ratio of f/6 or slower (meaning a higher number), you should be able to use a T-Mount adapter and not worry about the coma corrector.
Coma Corrector: If your telescope has a focal ratio of f/5 or faster (meaning a smaller number), you will most likely need a coma corrector. These are more expensive than T-Mount adapters but are crucial if imaging with fast instruments. These telescopes will allow you to gather light much faster than other telescopes, but at the price of coma aberrations. A coma corrector's job is to fix the elongated or triangular shape of the stars on the edges.
How to attach a DSLR camera to a Newtonian Reflector telescope
Remove any lens on the DSLR camera
Attach the T-Ring
Screw in the T-Mount Adapter or the Coma Corrector
Insert the camera into the telescope's eyepiece holder and tighten the screws
DSLR Camera > T-Ring > T-Mount Adapter > Telescope
OR
DSLR Camera > T-Ring > Coma Corrector > Telescope
Scenario 2: Refractor Telescope and One-Shot-Color Camera


What if you made the jump to an OSC (One Shot Color) cooled astrophotography camera, and own a small refractor telescope?
Most refractor telescopes with a short focal length will require a field flattener. This will give the stars on the edges of the frame a rounder and sharper shape. This particular telescope does not require a field flattener, which is good for us as those can also be costly.
One thing you need to worry about is achieving the correct back focus. You should be able to find how much back focus you need by visiting the website of your camera's brand, but you can also figure it out yourself by trial and error.
In this case, we will need to attach one of the two extenders that came with the camera.
How to attach a cooled One Shot Color camera to a Refractor telescope
Remove the cap from the camera
Screw in an extender (if needed to achieve the correct back focus)
Screw in the field flattener (if needed)
Attach the camera to the telescope
One Shot Color Camera > Field Flattener (optional) > Extender (optional) > Telescope
By the way, you can follow the same path if you are using a DSLR camera!
DSLR Camera > Field Flattener (optional) > Extender (optional) > Telescope
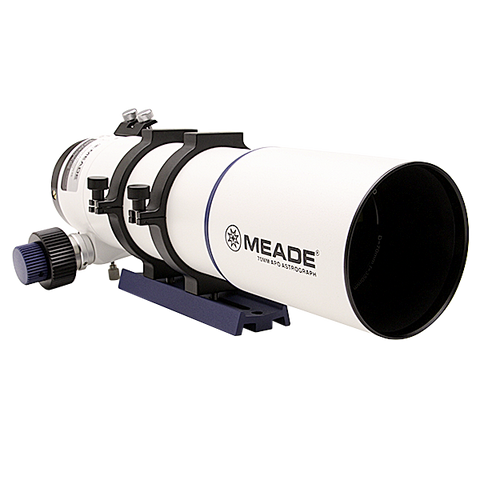
The ZWO ASI 071MC attached to the Meade 70mm APO Astrograph

Scenario 3: Reflector Telescope and Monochrome Camera with Filter Wheel


Third scenario! Let's assume you have been using a DSLR camera and a Newtonian reflector telescope for a while and have just upgraded to a cooled monochrome camera dedicated for Astrophotography!
Here, we'll be using our Newtonian once again and our ZWO ASI 1600MM camera.
First of all, congratulations, this is what we went through and the quality of our images have gone up as soon as we made the switch!
Second of all, it's a good thing you are here. We did not really find the best way to attach our new camera to our telescope, and our first few images had really bad coma as seen in Episode 12 of Galactic Hunter.
The main difference between monochrome cameras and OSC/DSLR cameras is the fact that you now need to include a filter wheel. This will allow you to use different filters to get different kinds of black and grey channels which you can later combine into one color image.
Once again, we will be using our coma corrector in this example because our telescope has a fast focal ratio. Also, make sure you achieve the correct back focus (which will depend on your camera) or you will not get pinpoint stars.
How to attach a cooled Monochrome camera and filter wheel to a Reflector telescope
Remove the cap from the camera
Screw in the camera directly to the filter wheel
Screw in an extender (if needed)
Screw in the coma corrector on the other side of the filter wheel
Insert it into the telescope's eyepiece holder and tighten the screws
Monochrome Camera > Filter Wheel > Extender > T-Mount adapter > Telescope
OR
Monochrome Camera > Filter Wheel > Extender > Coma Corrector > Telescope
We hope this will help some of you if you are new to astrophotography. We will try to add extra scenarios to this post if we get to try out new types of telescopes (for example, a Dobsonian or a Schmidt-Cassegrain telescope). Make sure to visit the Tutorial tab on our website to learn more about the hobby!
You can watch our video below if you'd like to see us go through each scenario. Do you have any requests? Let us know in the comments and we'll try to help as much as we can!
Clear Skies,
Galactic Hunter
ASTROPHOTOGRAPHY TUTORIALS


GALACTIC HUNTER BOOKS
Description: Discover 60 Deep Sky Objects that will considerably improve your Imaging and Processing skills! Whether you are a beginner, intermediate, or advanced astrophotographer, this detailed book of the best deep sky objects will serve as a personal guide for years to come! Discover which star clusters, nebulae, and galaxies are the easiest and most impressive to photograph for each season. Learn how to find each object in the night sky, and read our recommendations on imaging them in a quick and comprehensive way. Each target in this guide contains our advice on imaging, photos of expected results, and a useful information table. We've also included a few cool facts about each target, a map to find it in the night sky, and more!
Description: The Astrophotographer’s Journal is a portable notebook created for the purpose of recording observations, cataloguing photographs, and writing down the wonderful memories created by this hobby. This book contains more than 200 pages to memorialize your stargazing and imaging sessions, as well as a useful chart on the last pages to index exciting or important notes. Read back on the logs to see how much progress you have made through the months, the problems you overcame, and the notes taken to improve in the future. Just as the pioneers of astronomy did in their time, look up and take notes of your observations as you are the author of this star-filled journey.
Description: The Constellations Handbook is a logical guide to learning the 88 constellations. Learning the constellations is difficult. Remembering them is even harder. Have you ever wanted to look up to the night sky, name any pattern of stars and be able to tell their stories? This book groups the constellations in a logical order, so that the reader can easily learn them by their origin, and see how their stories interact with one another as a group. The last pages of this book include an index of all 88 constellations, each with a slot where you can write your own personal tips and tricks in order to memorize them with ease. The Constellations Handbook is not just another guide listing all the constellations from A to Z and their location, it is the perfect companion for stargazing, and a learning journey through the ages.


