
What is the Best Smart Telescope for Astrophotography
- Antoine & Dalia Grelin
- Dec 13, 2023
- 18 min read
Updated: Feb 26
Smart Telescopes are on the rise, and there are currently in our opinion four telescopes that compete for the title of best smart telescope.
We have assembled the Quadfecta of smart telescopes, and will compare them head to head to find out which one is best! We will be looking at the eVscope from Unistellar, the Dwarf II telescope from Dwarflab, the Seestar from ZWO, and finally the Vespera from Vaonis.
We will go over the physical differences between each telescope, compare their specifications, and their price! We will also set up each telescope side by side in our light-polluted backyard here in Las Vegas, and point them all to the same targets. We will see who's best at capturing the Moon, a planet, a deep-sky object, and even the Sun!

Which telescope will win this ultimate test? Let's find out!
Disclaimer
The eVscope shown in our comparison video and in the pictures of this post is a first-gen eVscope as this is the only one we could get our hands on. Thanks to our friend Patrick for letting us use his! To keep things fair, we have populated the specifications table with the Gen 2 eVscope as it has better specs than Gen 1 and is more up-to-date.
Several types of these telescopes are available, for example, Vespera comes in different versions (Vespera Pro, Vespera Passengers, etc) and Unistellar sells different versions of their smart telescopes (EVscope, EQuinox, etc). We chose the models we could get our hands on, but please keep in mind that different versions might get better results than shown here!
The moon picture with Seestar was taken on a different day, because the moon was setting behind the trees and we didn't have time to point the Seestar there after the three others. Overall it shouldn't matter though.
Most pictures on this post had to be compressed so that the page doesn't take forever to load. Watch our video to see the images in higher definition.
Smart Telescopes Physical Comparison
First, let's look at the four smart telescopes side by side, and appreciate their design. We'll specifically look at their overall shape, where the ports and buttons are located, how many there are, their size, their weight, the tripod, and if they have any unique features compared to the others.
Unistellar EVscope

The eVscope from Unistellar has a modified reflector design and is by far the largest and heaviest smart telescope in this list.
Overall, the eVscope is the smart telescope that looks the most like a "regular" telescope. It is made up of an optical tube, has an eyepiece, and is focused manually with the help of an included Bahtinov mask.
The eVscope is, by default, space-gray and black. It has the lettering "Unistellar" on one side of the optical tube.
Optics: The optical tube is larger and heavier than, let's say, a typical small beginner refractor telescope. At the end of the tube are spider vanes, like you find on reflector telescopes. The bottom of the tube is where the focuser is built.
Tripod: The tripod is tall and the legs can be extended.
Ports: There are two ports on the eVscope located under the mount's arm. The charging port is a USB-C port, and the other port is a regular USB-A port.
Buttons: There is one button that serves as the power button, placed on the main side of the mount's arm.
Weight: The Unistellar EeVscope weighs 19.8 lb (9 kg).
Unique physical features: An eyepiece is built onto the tube. This allows you to look through the eVscope just as you would with any other telescope, and give you the true sensation of looking through a telescope. Let's be clear though that this eyepiece is in reality a small tube and screen, so the photons coming from the object you are looking at are not actually hitting your retina, but the camera sensor.

DwarfLab DWARF II
Let's go from one extreme to the other, and now take a look at the smallest and lightest smart telescope in our list, The DWARF II telescope from DwarfLab!

The DWARF II is so small that it is the easiest to carry around anywhere. It will fit in any bag and be just fine on a plane or other vehicle for travel.
Its tiny size means the telescope sits very low to the ground, which is great against wind but could be an issue if your backyard has limited space and the sky is obstructed by sheds, fences, or other objects. This can easily be fixed by placing the telescope on a bar chair or a table.
The DWARF II has a periscope design, and two lenses! The lenses (one wide angle and one telephoto) point down to be hidden and protected when the telescope is not in use, but will rotate up and reveal themselves when the unit slews around. The DWARF II is cream-white with a very cool-looking tripod!
Optics: One wide-angle lens and one telephoto lens! The optical "tube" rotates up and down as the unit itself goes left or right.
Tripod: Very small but cool alien-looking tripod. The legs unfortunately cannot extend.
Ports: The only port on the DWARF II telescope is the charging port, which is accessible on the side of the base. You can see it on the attached image.
Buttons: There is only one button which is the power button on the side. It will light up green once the unit is ON. Luckily, you can turn off this unwanted light from the app.
Weight: The DWARF II only weighs 2.6 pounds (1.2 kg) which is insane!
Unique physical features: The DWARF II's double lens design is truly unique, and can be useful when slewing to objects like the moon manually. Another nice feature is the fact that the battery is removable, meaning you can have several batteries and keep the unit imaging all night long! Lastly, we really like the filter holder which is magnetic and makes it so simple to attach filters in just a second.

ZWO Seestar

Let's now move on to ZWO's first smart telescope, the Seestar! This is a matte black telescope with a triplet optics design and a swivel arm.
The Seestar feels very robust and is easy to carry with one hand thanks to its lightweight and its padded tripod legs. This is a triplet apochromatic telescope that comes with its own carrying case and solar filter!
The Seestar logo and text are visible on one side of the telescope, with the other side having the power button.
Be sure to read our full review of the ZWO Seestar.
Optics: The arm that hosts the lens and sensor rotate up to the sky when in use. The whole unit feels nice despite its plastic build.
Tripod: The tripod is small but can become a little taller if needed. The tripod legs are padded, making it easier to carry the whole telescope around even in cold weather.
Ports: There is one port on the Seestar on one side of the telescope to charge it.
Buttons: There is just one power button on the seestar, on one side of the telescope.
Weight: The ZWO Seestar weighs 6.6 pounds (3 kg).
Unique physical features: Some cool features are built into the Seestar, like a digital bubble level, or a voice that will talk to you when it is ready to connect for example. The app is also nice as it has a community tab where you can share your images and connect with other Seestar users. The Seestar has a built-in light pollution filter meaning you do not need to attach a physical filter yourself, and that's awesome!

Vaonis Vespera

The Vespera from Vaonis is the last telescope on this list! The Vespera is in our opinion the one that looks the most modern and sleek, with a beautiful smooth white case and round edges.
The Vespera is a quadruplet apochromatic telescope that is a little taller and heavier than the Seestar from ZWO, but still very portable. We recommend purchasing the Vespera backpack if you intend to travel with this telescope a lot, as everything including the filters and tripod will fit nicely in there.
The Singularity app to control Vespera is the most advanced app of all four telescopes, and is full of information about many deep sky objects.
Be sure to read our full review of the Vaonis Vespera.
Optics: The arm with the lens and sensor swivels up when pointing to an object. It is white on the outside, but black on the inside side.
Tripod: The tripod is made of metal. The base, and all three individual legs need to be screwed in one by one. The legs only extend a tiny bit, but that is mostly to level the telescope and not to make it taller.
Ports: There is one magnetic port near the bottom side of Vespera, used to connect either the bubble level or the charging cable.
Buttons: The only button on Vespera is the power button on the top side of the telescope. It is tactile meaning you do not need to press it but simply tap your finger on it.
Weight: The Vaonis Vespera smart telescope weighs 11 pounds (5 kg).
Unique physical features: The tactile button is a nice touch that feels very modern, although it can sometimes turn on accidentally by itself which does get annoying. The magnetic port is also great! The whole unit and tripod are made of metal and so feel very strong especially for the long term, at the cost of extra weight. A hygrometer is available for purchase and will screw in near the lens, having this accessory will automatically close the telescope if it senses rain during the night. The built-in battery is very good and lasts for more than a full night.

Physical Comparison Summary
We have compared the eVscope, the DWARF II, the Seestar and Vespera side by side, and went over their design, their size, weight, and physical attributes.
So what is the best smart telescope design-wise and only looking at physical attributes?

Design
When it comes to overall design, Vespera gets the win. It is modern, sleek, and simply beautiful. The tactile button and magnetic port is a nice touch, and the way the arm opens is really cool.
Size, Weight, and Portability
The lightest and smallest smart telescope is of course the DWARF II. It is by far the most portable out of the four at only 2.6 pounds!
Tripod
The smart telescope that comes with the best tripod is, in our opinion, the Seestar. It is adjustable, padded, and can still be small when retracted.
Unique Features
Each telescope has cool unique features. The eVscope has an eyepiece, the DWARF II has two lenses, the Seestar has a built-in filter and bubble level, and Vespera has a hygrometer for purchase. The winner of this category would either be the eVscope (if you care about the "eyepiece feel") or the DWARF II for its double-lens design and magnetic filter holder.
To conclude this section, here is an easy-to-read comparison table that summarizes the physical attributes of the four smart telescopes:
| eVscope | DWARF II | Seestar | Vespera |
Design | Modified Reflector | Periscope | Triplet | Quadruplet |
Tripod | Tall, Adjustable | Small, Non-Adjustable | Small, Adjustable | Small, Slightly Adjustable |
Ports | 2 | 1 | 1 | 1 |
Buttons | 1 | 1 | 1 | 1 |
Weight | 19.8 lb | 2.6 lb | 6.6 lb | 11 lb |
Unique Features |
|
|
|
|
We made a video where we compare the four telescopes side by side, be sure to watch it if you'd like to learn more about each and see how they differ in size and more!
We'll now place these four smart telescopes into the arena and see which one is best at astrophotography. We'll point them at a nebula, a planet, the moon, and the sun.
The Main 4 Smart Telescopes Compared: Specifications
Before we start the imaging test, let's go over their respective specifications so that we know exactly what we're working with.
| eVscope 2 | DWARF II | Seestar | Vespera |
Sensor | IMX347 | IMX415 Starvis | IMX462 | IMX462 |
Aperture | 114mm (4.5”) | 24mm (0.9”) | 50mm (2”) | 50mm (2”) |
Focal Ratio | f/4 | f/2.4 wide, f/4.2 telephoto | f/4.9 | f/4 |
Focal Length | 450mm | 100mm | 250mm | 200mm |
Field of View | 3° | Up to 3.2° x 1.8° | 1.29º x 0.73º | 0.78° x 0.57° |
Resolution | 7.7MP | 2MP wide, 8MP telephoto | 2MP | 2MP, 8MP with CovalENS |
Remember that for this test, we were only able to get our hands on a Gen 1 eVscope, so please keep that in mind when you see the results it produces, as the newer versions of the eVscope would likely produce better images.
Would you like to learn Milky Way photography with our premium online course?
Join our Milky Way astrophotography course!
It is divided into two sections, beginner, where you'll learn how to take your very first picture of the Milky Way, and advanced, where we teach you how to take Milky Way Arch panoramas, tracked Milky Way shots, stacking, and more.
The Best Smart Telescopes for Deep-Sky Astrophotography
This is it, the ultimate showdown. Who is best between the eVscope, Dwarf II, Seestar, and Vespera?
We will put each of these to the test, by not only pointing them at a deep sky object, but also at the moon, a planet, and the sun. Who is going to perform better?

It is time. We’re going to allow each unit to image the same target for exactly one hour. We’ll pick a good beginner target for this test, and go with the famous Orion Nebula.
We strongly suggest watching the video for this as it shows you much more than what is written here!
The Orion Nebula with the Unistellar EVscope
First up is the eVscope. The image became impressive very quickly in less than 30 seconds, but as you can see, the core was completely destroyed. It was still cool to look through the eyepiece, and the final picture after one hour wasn’t bad despite the blown-up core.

The Orion Nebula with the DwarfLab DWARF II
Next was the tiny DWARF II! It is David vs Goliath... who will come out on top?
This was our first time using the DWARF ever so we weren’t sure what settings to use, but let’s assume that the ones we selected were okay and see what we get.
The result after an hour is… great! The core looks natural and the other gasses are nice too.

The Orion Nebula with the ZWO Seestar
The Seestar is next to enter the ring! This is we believe the most popular smart telescope since its release, so let’s see what it can do.
The picture became better and better as the minutes passed, and the end result is very good! The only issue is the halo on the bright star (top right), which is not very visible here but can be seen better in the video.

The Orion Nebula with the Vaonis Vespera
Vespera is the last one to show us what it can do, so watch out!
We could have used the awesome mosaic mode to get more gasses in our frame, but decided to just use the regular one-click framing so that it’s fair when compared with the other telescopes.
And wow! Another very good image and... very close to the Seestar in quality.

Nebula Imaging summary
It is time to reflect on these four images and decide which smart telescope achieved the best result.
The Orion Nebula is the brightest and easiest nebula out there, so this target tends to look good no matter what, but at least because it was the same target for each, we have a fair comparison to show you anyway.
Let’s take a look at all four again. The first one to get KO’d in the ring was in our opinion the eVscope. Let’s remember though that this is a Gen 1 eVscope so the new ones are probably better. The one coming in third place in terms of quality is the DWARF II. We like the wide field of view, especially on this target, but the other two telescopes have more details and gasses visible.

So the fight will be between Seestar and Vespera. The two results are almost identical, but Vespera's photograph does have more detail, less noise, and no halo on the bright star.
2
Winner of the Deep-Sky Astrophotography test: Vespera 🥳
The Best Smart Telescope for The Moon and Planets
Let’s move to Lunar and Planetary imaging. We know that smart telescopes are not designed to get awesome pics of the moon and planets, but many of you will still try to snap pics of these, so let’s see what we can expect from each! To be fair, we'll use the default automatic settings for each telescope and not touch the settings manually for now. Let's see if the scopes are smart enough to use the right setting for these bright objects!
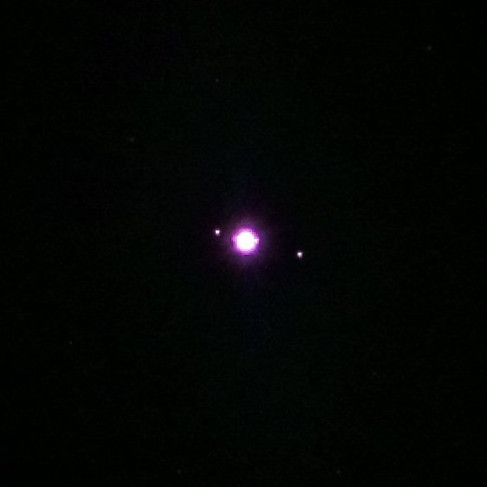
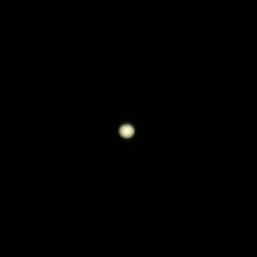
The Moon and Jupiter with the Unistellar EVscope
The first one will be the eVscope again. The moon doesn’t look bad, but not too impressive either. Jupiter is actually pretty good and the bands are even slightly visible! This is impressive for a smart telescope, although it makes sense since it has a longer focal length and better aperture than the other three.


The Moon and Jupiter with the DwarfLab DWARF II
The moon through the DWARF II looks okay, but not as crisp as the eVscope. This image could potentially be enhanced and made much more detailed if using the live stacking feature of the DWARF, but shown below is just a single shot.
The moon is very easy to find if you want to slew to it manually thanks to the wide-angle lens. You can simply look for the bright moon in the sky, center it in the widefield view, and switch to the telephoto lens.
Jupiter, at that focal length, does not show any detail whatsoever. You can increase the brightness to see a couple of the bright moons near the planet, which is cool and better than nothing!

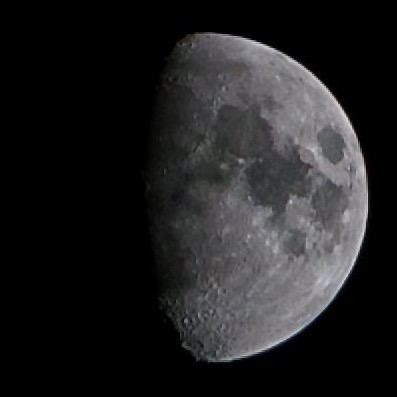
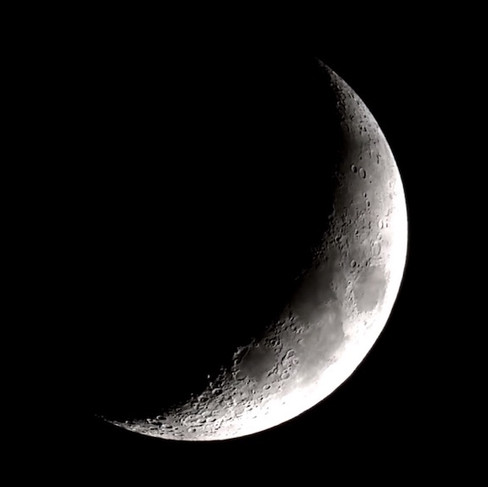
The Moon and Jupiter with the ZWO Seestar
Seestar does a great job at imaging the moon. In this shot, the details in the craters are well visible, and the Crescent moon looks overall very pretty. The only issue is that using the default automatic settings, the lower part of the moon looks too bright, but that could probably be fixed if you reduce the exposure time or gain a little bit.
Using the automatic settings on Jupiter will make the planet appear overblown, but several moons are visible which is nice. You can once again likely get a better result if you fiddle with the settings.


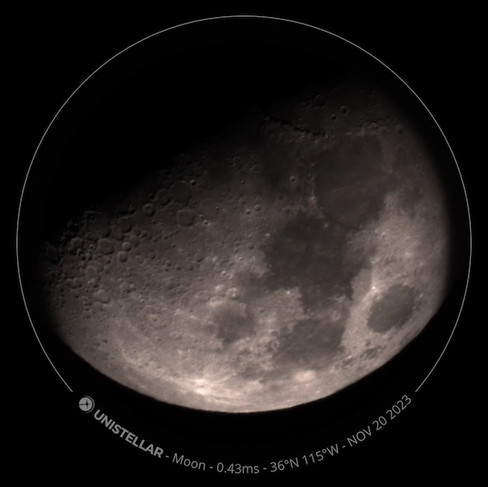
The Moon and Jupiter with the Vaonis Vespera
Vespera snapped a nice picture of the moon without any overblown regions. This moon phase was different than the one shot with Seestar, so maybe it helped a little bit as the moon was more visible, but either way, the moon looks great, detailed, and natural.
As for Jupiter, Vespera impressed us here, because we were fully expecting the automatic software to use the same settings the Seestar did and completely blow up the planet. Instead, we got a nicely exposed Jupiter with even some very faint bands visible!


Lunar and Planetary Imaging Summary
Who will take the crown as the best smart telescope for imaging the moon and planets?
Moon: The eVscope and DWARF II got an okay result, but nothing impressive. The Seestar and Vespera got the two best images. Despite the Seestar's moon being over-exposed, we'll give it the benefit of the doubt and blame the smaller Crescent moon phase for that. Detail-wise though, when comparing the craters of the Seestar and Vespera moons, the better result comes from Vespera.
Planet: We have two well-exposed and two over-exposed planets. If we zoom in on both well-exposed planets, the EVscope's image definitely shows more of Jupiter's bands and is overall better than Vespera's. This is not a surprise as the eVscope is the one with the longest focal length and largest aperture.

For those of you who are going to say that we should have used manual settings to properly expose Jupiter each time instead of letting the smart telescopes pick for us, we can tell you that the results below would not have changed. Vespera still would have had more details no matter what, and the EVscope is by far the winner for planetary.
Winner of the Lunar Astrophotography test: Vespera 🥳
Winner of the Planetary Astrophotography test: eVscope 🥳
The Best Smart Telescope for Solar Photography
Not everyone is interested in solar photography, but it is nice to know that smart telescopes can easily take pictures of the sun, which can also be exciting if you're looking for an easy way to shoot solar eclipses!
These Sun pictures were taken on different days, so it is not a perfect comparison due to how different the sun activity is from day to day, but it still shows you what each telescope is capable of. Let's see what kind of images we can get from the four smart telescopes pointed at the sun.
The Sun with the Unistellar EVscope
We sadly could not get a solar filter for the eVscope we were testing. Instead of skipping the sun, we decided to grab a picture from online forums from a different user!
The sun looks very good with the eVscope, with a lot of texture and a great natural color. Just like the moon, the sun fits nicely in the eVscope's field of view despite its longer focal length.

The Sun with the DwarfLab DWARF II
The sun is easy to center in the DWARF II's telephoto field of view thanks to the widefield camera. Through DwafLab's solar filters, the sun looks not orange/red like the other telescopes, but white.
This doesn't really matter as you can of course see the areas of activity just as well, but it does feel a bit less exciting without that "wow factor" that a bright red sun gives.

The Sun with the ZWO Seestar
The Sun through the Seestar is the one that looks the most colorful and saturated of all. It is very bright red and orange, with the sunspots nicely visible when active.
Finding the Sun with the Seestar is automatic as long as you are perfectly level, but you might sometimes need to center it manually which can be tricky.

The Sun with the Vaonis Vespera
The Sun with Vespera isn't as saturated as the picture Seestar produced, but it does show slightly more texture on the surface, although not as much as the eVscope.
The Sun overall looks nice using Vespera, and slewing to it is a breeze thanks to a very smart yet simple technique which we go over in our Solar Photography tutorial video using Vespera.

Solar Imaging Summary
The Sun looks nice using each of the smart telescopes, and each time it only took a few minutes to set the device down and snap the picture! At first glance, the most impressive result seems to be the one from Seestar, but that is mostly because it is the most visually colorful! When zooming in on each image, the eVscope by far shows the most details and texture on the surface while still having a natural color.

Vespera comes quite close to the eVscope's result, and probably can top it with some processing on the computer, but right out of the unit, the eVscope wins this round!
Winner of the Solar Photography test: Unistellar eVscope 🥳
Final Thoughts on the Best Smart Telescopes Available
This was a fun comparison! We went over the physical differences between these four smart telescopes, their specifications, talked about the advantages of each and finally compared their capabilities under the stars.
But a question remains...
What is the Best Smart Telescope?
Design
Physically, the overall winner in our opinion is the DWARF II from DwarfLab. It is much smaller and lighter than the other three smart telescopes, making it even easier to travel with anywhere, and also less difficult for kids to set up! It also has a nice magnetic filter adapter which makes it a breeze to attach or remove filters in one second.
Deep Sky Astrophotography
The smart telescope that produces the best results when used to image deep-space objects is the Vespera from Vaonis. The data is more detailed and has less noise than what the other telescopes showed. The CovalENS (mosaic) feature is also a fantastic idea that allows you to widen your field of view even move and completely customize the aspect ratio.
Lunar Photography
The best smart telescope for lunar photography seems to be Vespera. The moon picture it took was the most detailed of the four and the craters and automatic exposure time seemed the best!
Planetary Imaging
The EVscope from Unistellar got the best result of Jupiter as it is the only telescope that showed the bands clearly. Vespera comes in second, as the bands could be spotted but looked very blurry.
Solar Photography
The best image of the Sun we got came from both the Seestar and Vespera, but online searches showed us that the eVscope (the only telescope that we didn't have a solar filter for) could produce even better images of our star. If we believe that these online images came straight out of the unit without further processing, then the eVscope wins the Solar Imaging category!
Price
At the time of writing this review, the prices for these four telescopes are:
eVscope - $4,899 for the newest generation of eVscopes. Another good option without an eyepiece is the eQuinox which costs $2,499
DWARF II - $459
Seestar - $499
Vespera - $1,499
As you can see, the most affordable of the four telescopes is the DWARF II, with the Seestar following very closely at $499. If you are looking for a budget-friendly telescope, you should of course pick one of these two units. The DWARF II is tiny and extra light, but the Seestar does produce higher-resolution images. Considering that ZWO also decided to include a free solar filter with the Seestar, the price difference between the two no longer exists if you were planning on getting a solar filter anyway.

If you are looking for the best of the best and have a higher budget, Vespera is in our opinion the best choice here. It is built with high-quality material, the app is excellent, and the mosaic feature is lovely. We were not able to compare it with a new eVscope or eQuinox, but we've used Vespera for several years now and have been impressed several times by its capabilities. If your main goal is to do deep sky imaging, and the $1,500 price tag isn't an issue, the best smart telescope of the four is Vespera.
If you are planning on purchasing a smart telescope and found this guide helpful, you can use one of our affiliate links to thank us at no cost to you:

Please check out the Smart Telescope courses premium bundles. It has so many lessons and will likely still grow over time. It includes the ZWO + DWARF + Unistellar scopes + Vaonis courses. It also has the Smart Telescope processing guide, the Messier catalog template, and access to the Galactic Lounge.
Be sure to check out our smart telescope page, and don't hesitate to let us know if you have questions below!
Clear Skies,
Galactic Hunter


