
SeeStar S50 - ZWO's First Smart Telescope - Full review
- Antoine & Dalia Grelin
- Nov 18, 2023
- 12 min read
Updated: Feb 26

Smart telescopes are on the rise, and ZWO understood that!
The Seestar S50 is ZWO's first entry into the world of smart telescopes, and it honestly does not disappoint.
Small, easy to use, incredibly light, and with a price tag under $500, owning a Seestar almost feels like a no-brainer... but would you truly enjoy using this in the long run?
In this review, we will tell you everything you need to know about Seestar and show you what it is capable of. We'll use it for both solar and deep sky imaging from our light-polluted backyard, and see if the results are any good.

Table of Contents:
What's in the box?
Specs & Price
Size, Weight, and Mounting
Seestar App
Deep Sky Objects Captured with Seestar
Planetary, Lunar, and Solar Astrophotography with Seestar
Final Verdict | Pros & Cons
Seestar S50: What's In The Box?
The Seestar comes in a single box and has its own included carrying case. The carrying case that holds the Seestar is almost identical to the carrying case that ships with the ZWO AM3 mount. It has a handle and everything fits nicely in there.
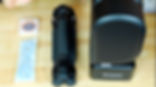
In the box we received:
The ZWO Seestar S50
A Tripod
A Solar Filter
A Carrying Case
A USB Type-C Charging Cable
A Manual
The charging cable does not include a wall adapter, so you'll need to plug the USB end into your own wall brick.
The Tripod

The Tripod that comes with the Seestar is like a mini version of the TC40 tripod that ZWO sells for the ZWO AM3 and AM5 mounts.
The tripod is small with a total length of 274.5mm (10.8 inches) which feels just fine for the Seestar. If needed, its legs can be extended up to 363mm (14.29 inches)
Another option if you require a much taller tripod would be the ZWO TC40, which costs $299.
The Filters
The ZWO Seestar can be used with filters, the best part? Two of them are free!
Narrowband Dual-Band filter (20nm HA and 30nm OIII)
Solar filter (580-630nm bandpass)

The dual-band filter acts as a light pollution filter and is built into the Seestar! After slewing to the target of your choice, the Seestar app will either activate or deactivate this filter depending on what it thinks will provide the best result. You can also manually activate or deactivate the filter before launching your exposures.
The solar filter is a physical filter that comes in the box. It can be easily attached to the end of the Seestar's optical tube, and should obviously be used whenever you image the sun.
On top of that, a dark filter is also built into the Seestar for calibration purposes. You do not need to worry about this one as it will be automatically used during the auto-processing.

ZWO Seestar: Specs and Price
Let's now talk about the Seestar's specifications and price.
Seestar is a triplet apochromatic telescope, which helps get rid of chromatic aberration. It uses the Sony IMX462 CMOS sensor which has a resolution of 1920 x 1080 pixels (2 MP). The Seestar has an aperture of 50mm (1.97 in), a focal length of 250mm, and a focal ratio of f/5.

Seestar has built-in Bluetooth and WiFi, a battery life of approximately 6 hours, and can save images as .JPG or .FITS if you'd like to process the data yourself on your computer. Also built into Seestar are an electronic focuser, a dew heater, and a filter wheel. The mount design is alt-az.
Connecting to the Seestar, slewing to a target, focusing, and launching an imaging sequence only takes a few minutes and is overall completely stress-free.
At the time of writing this review, Seestar costs $499 + tax in the United States and is available for purchase at High Point Scientific. It costs 680 € in Europe.
Get the ZWO Seestar Premium Online Course!
Completely master your Seestar from A to Z with the ZWO Seestar Smart Telescope Mastery course!
This includes 117+ lessons (text, videos with commentary, downloadables...), it is available with closed captions in four languages, and goes through every single aspect of the Seestar you can think of!

You can also get the Smart Telescopes Mastery Bundle, which includes not only the Seestar course, but also the Dwarflab course, the Unistellar Telescope course, the Vaonis course, the Smart Telescope Processing Guide, and extra downloadables!
Size, Weight & Setup of Seestar
Weight: 5.5 lb (2.5 kg)
Height: 257mm (10.12 in)
Width: 142.5mm (5.61 in)
Depth: 130mm (5.12 in)

Seestar weighs 5.5 pounds (2.5 kilograms) making it one of the lightest smart telescopes available! It has a size of 10.1 x 5.6 x 5.1 inches (26 x 14 x 13 centimeters).
Seestar is light enough to be transported easily wherever you travel, including on a plane. You can either use a backpack or the box it came with.
How to set up the Seestar Telescope?
It is very simple and fast to setup Seestar under the stars, and shouldn't take you more than a couple of minutes.
First, place the tripod on the ground, and make sure to level it properly using the bubble level.
Next, take Seestar out of the box and screw it on the tripod
[Optional] If you intend to do solar photography, open Seestar's arm and attach the solar filter at its end.
Use the power button to turn on Seestar, and connect to it through the app on your phone.

And that's it! As simple as that! Your next step, once connected, would simply be to pick a target and slew to it.
If, like us, you always leave the Seestar on its tripod even when you bring it back inside your house, you can simply carry it outside each night without using the bubble level to level it. Instead, tap the "Device not level, go adjust" text on the main tab to see a live digital bubble level.
Then you simply need to extend a leg or two while looking at your screen until the bubbles become green.
The Seestar App
The app you'll be using to photograph the night sky with Seestar is called... Seestar!
With the Seestar app, you'll get suggestions on objects to image depending on the time and your location. You'll also be able to slew the telescope to any target you want to image, and can also share your results with the community!

Seestar is free, easy to use, and is made up of five tabs.

The first tab is the Seestar tab. This tab acts as the main dashboard and it is where you'll connect to your Seestar smart telescope.
On this tab, you will find information about your Seestar, the weather for your location, and the current moon phase.
Under the weather widget you will find buttons for each imaging mode for the Seestar. If you plan on doing deep space astrophotography, the correct mode to use is "Stargazing". For Solar imaging, it is "Solar", and so on.
Below that you will find several recommendations for targets you can capture tonight. You can also keep scrolling lower for information about current celestial events, for example, planetary conjunctions, meteor showers, and more.

The second tab is the Sky Atlas. This is what you will use to slew your telescope to the target of your choice. It is very simple to use and you can look for almost any object listed in the catalog.
To do so, simply hit "Objects" at the top right corner of the screen, and input either the designation or the nickname (if any) of the object you'd like to slew to.
Tap on "GoTo" and the telescope will automatically aim itself at your target and verify it is properly centered using plate-solving.
Slewing from one object to another is very quick and takes less than a minute or two including the plate-solving process.
Once you are centered, tap the down arrow at the top left corner to close the Sky Atlas tab.

The third tab of the Seestar app is the Community tab. This is where your images will be displayed if you decide to share them with the community. You can also like and comment on other people's images, see their profile and other pictures, as well as invite them to be your friend.
In short, the Community tab is just like an Instagram feed with just images taken by the Seestar smart telescope.
If you do not like to share your images, you can still browse the feed and get inspired by what other people have imaged. This is a great way to quickly see which targets are good with the Seestar and which ones can be skipped.
There are two more tabs on the Seestar app:
"Nearby" tab
This will open up a map of your area and show you where images from the community have been taken. Using the map, you can see exactly where nearby Seestar owners image from, which could be great to find good dark sky locations, but since most people use their Seestar from their backyard, it is a little bit creepy to be able to see exactly where they live. If you do not want to share your address with the world, be sure to uncheck your location sharing when uploading your images.
"Me" tab
This is your profile page. It shows your profile picture and the images you decided to share. This is also where you can tweak your settings.
Overall, the app is great and easy to use, but it definitely will need a few updates before it is perfect. Only the images you have shared appear on your profile, and you'll need to navigate to the Stargazing window to get all your shots which can be confusing at first. The word "Gazing" is used a bit awkwardly in the app which seems like a translation issue that can easily be fixed in a future update. The connection issues when not in airplane mode (at least for iOS users) are a bit annoying, but once again, will likely be fixed easily soon.
Deep Sky Astrophotography using Seestar
The main type of targets you'll likely be shooting with the Seestar, at least if you live in the city, are nebulae, specifically emission nebulae. These are great targets to shoot with the dual-band filter as the filter blocks a lot of the light pollution.
The very first target Seestar captured was the famous Horsehead Nebula. This is technically not an emission nebula, but it is still a good object for the smart telescope from a light-polluted area. As you can see below, the result is pretty good! We did enhance the image slightly on PixInsight, but not by much (made it brighter and reduced the star size).

The main issue in this picture is the framing, which should have been tweaked, and the big fat halo on the bright star Alnitak, which is due to the built-in narrowband filter used.
The Pacman Nebula was the next target, once again with the duo-band filter. You can see two types of results below, one in true color, which is what the Seestar produced (once again slightly enhanced on the computer), and an HOO version on the right just for fun.
The Pacman Nebula with the Seestar


The last two deep sky targets imaged with Seestar from our Bortle 9 backyard were the Orion Nebula and the Crescent Nebula. The Orion Nebula looks very good, thanks to its brightness and size. THe Crescent Nebula doesn't look too bad, but is much noisier as the object is fainter.


Our Premium Astrophotography Course
Want to learn all aspects of astrophotography in the most efficient way possible?

The Galactic Course includes a LIFETIME membership that gives you unlimited access to all current and upcoming astrophotography content. Step into an ever-growing realm of knowledge and learn at your own pace. Make life-long friends and connections with other members, and get tips from instructors that truly care about your journey and progress under the night sky.
Planetary, Lunar, and Solar Imaging with Seestar
Seestar, like other smart telescopes currently available, was not built for planetary imaging and so do not expect to get good pictures of Saturn, Jupiter, Mars, and other planets. It was also not designed for lunar or solar imaging, but these two targets will actually look pretty decent as they are much larger than planets and so much easier to capture.
For this review, we decided to take a shot of a planet, the sun, and the moon for you to see what the results are like. You can find these images below.


Left: Jupiter - No details can be seen on the planet. It looks completely overexposed and fully white/yellow. The nice thing is that several moons are visible next to it, making the image at least a little bit impressive especially if you are showing it to kids or friends.
Center: Sun - Don't even point the telescope at the sun without attaching the solar filter first! If you do, you risk damaging the sensor. It is very important for you to properly level the Seestar before it slews to the sun, or it might not be able to find it! If it fails to find it, you will have the possibility to manually slew the telescope, but it is honestly very difficult to aim at the sun manually since you can't stare at it while pointing the telescope. The sun looks great, and we enjoy using the time-lapse mode which is nice when high clouds pass overhead.
Right: Moon - The Moon is of course a very easy target, and great images can be captured with any telescope, binoculars, or just a DSLR lens. Seestar does a great job at capturing the moon, with nice details visible and a result similar to what you'd expect with a telephoto lens.

Final Verdict
Is the ZWO Seestar good for astrophotography? What do we like? What do we dislike? Is it worth the cost?

The Seestar is small, lightweight, easy to use, and surprisingly not that expensive at $499. If, like us, you've been doing astrophotography for many years, you will not need a smart telescope like the Seestar and will likely find it useless after a while. This is unless you embrace the challenge of processing the data that comes out of it yourself using the smart telescope as a secondary scope during your imaging nights. You'll also find its solar imaging capabilities very nice, especially for events such as eclipses!
If you do not do any type of advanced astrophotography and like to keep things simple, then you will absolutely love the Seestar. It is a great way to get your first taste into the hobby of astrophotography, without all the frustrations and investment that come with a regular astrophotography rig.
Here are what we believe are the main positive and negative points about Seestar:
POSITIVES:
Ease of use, portability, quick setup
Seestar only takes a couple of minutes to set up, doesn't need to be polar aligned, and does everything else itself including autofocus.
The built-in filter and bubble level
This surprised us in a good way! The fact that a dual-band filter is built into Seestar makes it even easier to use! You'll never have to worry about dropping the filter or putting your nasty fingers on it since you cannot touch it. The digital bubble level is also a nice addition, as you do not need to bother checking the level on the tripod base and do not need to attach a physical bubble level to the telescope.
Seestar App
Despite a few minor issues, such as the connection problem or the way data is stored, the app is overall very well designed. The Sky Atlas has all the deep sky objects you'll ever need, the weather widget is well done, and the community tab will for sure please a lot of users.
NEGATIVES:
It won't beat a full Astrophotography setup in terms of image quality
This is the same as any other smart telescope but of course, it has to be said. If you're expecting a smart telescope to compete with (almost) any regular astrophotography rig, it can't! Seestar definitely has its limitations, and you'll need to accept that. Still, it can produce great images for beginners.
The halos
Although the built-in duoband filter is a great addition, it does produce some nasty halos on bright stars. Alnitak (near the Horsehead nebula) is of course badly affected, as well as several other stars in the night sky. Maybe a future version of the Seestar will have a higher-quality filter?
Planetary Imaging
Do not bother pointing Seestar at planets, you won't get anything more than what looks like a bright star. If you're dying to image your favorite planet, you can still get something cool like the moons of Jupiter, but that's pretty much it.
Out of curiosity, we tried taking a picture of pigeons with the Seestar and it looked great! Aiming manually was a breeze, and focusing was very fast.

Interested in adding Seestar to your equipment?
If you would like to purchase this product, you can do so at High Point Scientific!
If you already own this and have taken some great images with it, attach them to the comments section of this post so we can all see your work!
If Seestar is not the right product for you, but you are motivated to start Astrophotography, check out our complete guide on beginner astrophotography equipment!

Like I said earlier, I have just released a full online course about the ZWO Seestar which will help you get the very best out of the telescope so please check it out. It has so many lessons and will likely still grow over time. There is also a bundle available which is the ZWO + DWARF + Unistellar scopes + Vaonis courses.
It also includes the Smart Telescope processing guide, the Messier catalog template, and access to the Galactic Lounge.
ZWO Seestar Review Video
Below you can find our full review video about the ZWO Seestar, be sure to check it out!
Clear Skies,
Antoine & Dalia Grelin
Galactic Hunter
GALACTIC HUNTER BOOKS


