
How to clean your telescope's mirrors
- Antoine & Dalia Grelin
- May 5, 2020
- 7 min read
Updated: Jun 6, 2023
How do you safely clean both of your reflector telescope's mirrors? Most importantly, how do you put everything back together the right way and avoid issues such as pinched optics? Find out how in this tutorial!

If you own a reflector telescope, you will at some point need to clean your telescope's mirrors. The more you use it, the more likely small particles of dust are to find their way into your optical tube and get stuck on one of the mirrors. Usually, people clean their mirrors once every 5 to 10 years, but you may need to do it more often than that depending on the conditions of the air where you live and image. Indeed, you might find yourself having to clean your mirrors more often than others if you image in areas where lots of tiny grains of dust and other elements travel through the air easily, for example near beaches.
In our case, we decided to clean our mirrors about 5 years after purchasing the telescope. After talking to several people on Instagram, we realized that although dusty, our mirrors were completely fine for the time being and we should not have cleaned them yet! Well, it was too late to turn back, but we're glad we went through this process.
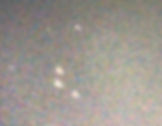
Why did we initially think we needed to clean our mirrors? The screenshot below shows an image of Messier 59 and Messier 60, covered with dust spots...

We made the mistake of assuming these spots came from one of the mirrors, when they actually came from the sensor window of our camera. The mirrors are actually way too far from the sensor to show such unfocused dust particles. Thanks to our followers on Instagram for explaining that to us! The only obvious dust spot that seemed to be on the mirrors are the two small, very back dots near the upper right and upper left area of the image.
I, Antoine, took care of this daunting task while Dalia was "busy" watching the Simpsons, so let me explain to you every step I went through to clean the mirrors of our 8" Newtonian reflector Astrograph.
First of all let me tell you that I was SCARED. I had no idea how to do this and spent all morning watching YouTube videos and reading posts on forums. Now that it's done, I can assure you that it's actually pretty easy. There are a few tricky parts to be careful about which were not in the videos I watched. I'm here to make sure you don't make the same mistakes, let's go!
What will you need?
Everything you'll need to clean both of your telescope's mirrors is on this table.
Your telescope, of course
Some dish soap
A bunch of cotton balls
A towel that doesn't release any lint
A regular screwdriver
Distilled Water

Make sure to have everything ready near you so you don't have to run around your house to look for cotton balls or a lint-free tower while your mirrors sit underwater in your sink...
When you are ready, it is time to do some surgery on your beloved telescope. Let's take its mirrors off.
Removing the Primary Mirror
Let's remove the Primary mirror first. In our case, that can easily be done by taking off the small screws all around the tube near the primary. Then, carefully remove the entire holding cell.
Next, remove the holding clamps. Be careful not to smash your screwdriver into the mirror, or you will cry.
You don't have to, but on all the videos I watched, people made a mark with a sharpie on both the mirror and the cell so that you can re-assemble it exactly how it was before. Then, just remove the mirror itself. It feels very strange to see the telescope missing its primary mirror. It's also pretty scary.

Removing the Secondary Mirror
Time to take off the secondary mirror!
I remembered doing this about 2 years ago to replace a broken screw, but forgot how I did it. I got lazy and didn't want to look it up and made the mistake of taking off the middle screw out first. Don’t do this, or you'll tear your spider vanes!
You need to carefully loosen the collimation screws first. Then, while holding the mirror with one hand, remove the middle screw. You should be able to retrieve the mirror once it is loose enough.

The tube is now all empty. The telescope... is no more.
Cleaning both mirrors
Time for a bath!

First, have enough water in your sink so that the mirror can fully be submerged. Don't waste the distilled water yet, that's for later.
Drop a tiny bit of dish soap, we only want enough for the water to be slightly soapy. Just slightly. We don't want any bubbles.
Grab your primary mirror and make sure to not put your greasy fingers all over it!
Slowly and carefully move it around in the water, this will remove most of the loose particles.
Do the same for the secondary mirror.
Place them vertically on a drying rack or anywhere safe.
Drain the water out since we don't want to keep all that dust for the next step.
The mirrors already look cleaner!

Now, fill the sink with water again and add the same amount of dish soap as earlier. Also, grab your cotton balls.
Submerge your primary mirror underwater, just like before, but now, we will actively take off the remaining dust with the cotton. Starting from the center of the mirror and moving outwards, carefully slide a cotton ball without using force.
Do this as many times as needed until you have cleaned the entire mirror. This will take a while, and many cotton balls, as you never want to use the same side of a ball more than once or you'll risk scratching the mirror with the dust you just collected. I would do one wipe, turn it over, do another wipe, turn it over maybe once more, and do a third wipe before getting a new ball.
Do the same for the secondary mirror, which should be much faster.
Drain all that dirty water, and grab your distilled water which will make sure there is no water mark left on your mirrors when they dry. Pour it on both mirrors, don't be afraid to waste, it's important.

The next part is pretty scary, if you feel confident enough, use your lint free towel to carefully absorb the remaining large water drops. I realize that my towel was completely useless and grabbed another one, I was pretty stressed out at that moment. Some people use hair dryers, I'm not sure if that's a better option.
My secondary mirror still looked dusty, so I did the whole process again and it came out much better after the second attempt. The primary mirror was also looking much better. Yes there are still some dust spots but that's completely fine.
Below is the Before Vs. After of cleaning the primary mirror. I wish I took both comparison images from the same angle but did not think about it then. Either way, the mirror looked much cleaner after the bath.


Putting everything back together
Now comes the most annoying part: re-assembling the telescope. We pretty much have to do everything backward, but there are a couple of traps that I fell into because I didn't know.

For the secondary mirror, you have to make sure you tighten up the collimation screws evenly.
If you don’t, the mirror will be either too high or too low compared to before, and you will have terrible vignetting on one side of your images.
We found this out the hard way and, as you can see on the image on the left, we had really bad vignetting on just one side of the picture on our next imaging session.
For the primary mirror, you need to make sure you don't tighten up the holding clamps too hard, or you will have what we call "pinched optics".
We found out the hard way and want to thank everyone on Instagram who told us why our stars were now triangular.
I had to remove the primary mirror again and ensure the holding clamps weren't too tight.
From what I learned, you should be able to fit a business card between the mirror and the clamp, so we finally found a use to our Galactic Hunter business cards since they're always sitting in our wallet for no reason. Also, if your clamps are too loose, your telescope will not be able to hold collimation and will lose collimation every time you slew your telescope. Yes, we also found this out the hard way.

Anyway once you're done, simply re-attach the cell to the back of the telescope and put the screws back all around.
And we are done!
Your next and final step would be to, of course, collimate your telescope again and try it out! Make sure you do not have any weird vignetting, triangular stars or collimation issues.
Tutorial Video
The video below will give you a much better visualization of how to clean your mirrors.
Clear Skies,
Galactic Hunter
ASTROPHOTOGRAPHY TUTORIALS


GALACTIC HUNTER BOOKS
Description: Discover 60 Deep Sky Objects that will considerably improve your Imaging and Processing skills! Whether you are a beginner, intermediate, or advanced astrophotographer, this detailed book of the best deep sky objects will serve as a personal guide for years to come! Discover which star clusters, nebulae, and galaxies are the easiest and most impressive to photograph for each season. Learn how to find each object in the night sky, and read our recommendations on imaging them in a quick and comprehensive way. Each target in this guide contains our advice on imaging, photos of expected results, and a useful information table. We've also included a few cool facts about each target, a map to find it in the night sky, and more!
Description: The Astrophotographer’s Journal is a portable notebook created for the purpose of recording observations, cataloguing photographs, and writing down the wonderful memories created by this hobby. This book contains more than 200 pages to memorialize your stargazing and imaging sessions, as well as a useful chart on the last pages to index exciting or important notes. Read back on the logs to see how much progress you have made through the months, the problems you overcame, and the notes taken to improve in the future. Just as the pioneers of astronomy did in their time, look up and take notes of your observations as you are the author of this star-filled journey.
Description: The Constellations Handbook is a logical guide to learning the 88 constellations. Learning the constellations is difficult. Remembering them is even harder. Have you ever wanted to look up to the night sky, name any pattern of stars and be able to tell their stories? This book groups the constellations in a logical order, so that the reader can easily learn them by their origin, and see how their stories interact with one another as a group. The last pages of this book include an index of all 88 constellations, each with a slot where you can write your own personal tips and tricks in order to memorize them with ease. The Constellations Handbook is not just another guide listing all the constellations from A to Z and their location, it is the perfect companion for stargazing, and a learning journey through the ages.


