
Can You Do Astrophotography from The City? - 7 Tips to get clean images from Heavy Light Pollution
- Antoine & Dalia Grelin

- Jun 26, 2021
- 10 min read
Updated: Mar 4, 2024

Light pollution is one of the worst enemies of astrophotographers. It can be very difficult, and uninspiring to image from a light-polluted zone. Sadly, most of the population in the world lives under heavy light pollution. Does this mean you cannot do astrophotography?
With the right knowledge and a smart choice of filters, you CAN capture incredible astrophotos from the city! We live in Las Vegas, a Bortle 9 zone, and are lucky to be able to image from dark sites just about one to two hours away... yet some of our favorite images were taken from our very own backyard!
In this post, we are going to go over several tips that will help you get past the frustration of doing astrophotography from the city, and inspire you to get better and cleaner images!
Do not forget to watch our full video about this subject at the bottom of this post! Also, if you are new to astrophotography, make sure to read our full beginner astrophotography guide!

As brainless_john nicely said in one of our YouTube videos, Bortle 9, we are NOT afraid of you! We were put on this earth to image the beauty of outer space, and you will NOT stop us.

More than 80% of the world's population lives in light-polluted areas, where seeing the Milky Way is usually impossible.
This is really sad because people who get into astronomy or astrophotography often get interested in the hobby because they love looking up at the sky. How do you expect someone to get hooked on something they cannot see in the first place...?
Living in Las Vegas, we almost never got into astrophotography. Our home is very close to the Strip, which is one of the most light-polluted places you can find on Earth along with some other major cities that love billboard ads and extravagant lights.
Lucky for us, we are able to escape this extreme light pollution by driving an hour or so towards... nowhere, in the desert. Some other people, on the East Coast for example, or in most areas of Europe, aren't so lucky...

Have you ever tried taking a long exposure picture of the sky from your Bortle 9 backyard? Although it makes sense to think that doing astrophotography from the city is a lost cause, it is NOT the case!
Believe it or not, some of our favorite shots of all time were taken from our extremely light-polluted backyard. In this guide, we'll give you some tips on how to slap light pollution in the face and capture your favorite deep sky objects from the city.
Tip 1: Use a Monochrome Camera!
This is the most obvious tip of all!
If you can only image from the city - we think it's worth it to save up for a monochrome camera and quality narrowband filters because it will change your life! Seriously!
Sometimes people are afraid to upgrade to a monochrome camera. That's maybe because they discover that the learning curve is steep and that because you are shooting with different filters one at a time, you'll need to spend triple the amount of time on a target in order to get good results.
WRONG.
We know the learning curve can be intimidating, but we made the jump from DSLR straight to mono, and look, we're still alive!
As for the "you need more exposure time because you have several filters" argument... You can spend one hour on a target with a color camera... and compare that with what you would get in one hour with a monochrome camera and still get a cleaner result with the monochrome camera.

It's worth noting that the monochrome camera is mostly worth getting if you plan on imaging emission nebulae.
Yes! The power of monochrome cameras is the narrowband filters. Narrowband filters are excellent for capturing emission nebulae, but become somewhat useless when imaging star clusters, or galaxies that don't have much hydrogen-alpha gas in them. They're also not that great for some nebulae, for example, dark nebulae or reflection nebulae.
The good thing is, there are PLENTY of emission nebulae out there, so you'll never run out of things to shoot!

A fantastic monochrome camera is the ZWO ASI2600MM, as well as the QHY268M. A cheaper option would be the extremely popular ZWO ASI1600MM, which is getting a little old now but still doesn't cease to impress!
We also have a full guide on how to pick the right camera for your budget, so make sure to read it! It is updated yearly to make sure it is always relevant.
Tip 2: What if all I have is a DSLR Camera?
Ok, so what if you just started and all you have at the moment is a DSLR camera?
The biggest challenge here, aside from light pollution, is going to be NOISE.
However, there are two things you can do to control your noise.

1) Never choose a high ISO. We usually use an ISO of 1600 when imaging from a Bortle 4 or better, but lower it to 800 or even 400 if using a DSLR from the city. Yes, the shots will look very dark, but you will be able to get a great result with stacking later on without an insane amount of noise.
That's right. The goal is to get the cleanest possible image!
2) Now, another factor that will impact your shots when using a DSLR camera is the outside temperature. This isn't something you can really control, but if possible, avoid shooting on very hot nights. You can also add a few seconds delay between each shot to let the sensor cool down a little bit. We often get super hot nights in Las Vegas during the summer and it affects our images.


Above is a shot of Messier 74 (the Phantom Galaxy) taken during a very hot night. Notice how it is filled with hot pixels? Click on the arrow to see the exact same target shot with the same camera on a cooler night just a few weeks later... Much cleaner!
Tip 3: Invest in filters... or don't
Another tip we'd like to recommend is to use filters. Good filters. Let's start with Narrowband. These are the obvious choice when imaging most nebulae. If you have a monochrome camera, use Ha, Sii, and Oiii filters when imaging from home.
HA filters are the absolute best in terms of fighting light pollution. They work extremely well from the city even when the full moon is out!
Sii is also pretty good, just try not to image in SII when the moon is out - unless you have no choice.
As for OIII, this is the "worst" out of the three. You can certainly use it on a moonless night from the city, and you'll get great results, but if you want the absolute best image possible, take images with the OIII filter at a later time away from a light-polluted place.
This is our approach at times. We image HA and SII from home, then drive away to the desert and finish off with OIII, as we did in Episode 15. We did image with all three NB filters from home plenty of times though and the results are fine too.

Another tip when it comes to narrowband filters is... if you have the money, try to upgrade the basic 7nm filters that come with some monochrome camera bundles to 3nm filters. 3nm filters will give you much cleaner and better images when imaging from the city. It took us years before upgrading to 3nm filters because they are very expensive. But if you're in this hobby for life, this is one of the best upgrades you can invest in.
Note: If you love imaging galaxies that have Hydrogen-Alpha in them, go for a 5nm Ha filter instead of 3nm. a 5nm Ha filter will give better results over a 3nm filter when imaging galaxies.

If you have a DSLR camera or a One-Shot Color camera, getting a duoband narrowband filter like the Optolong L-Ultimate is a solid move. Much like other filters, it's going to cost a pretty penny but it will allow you to capture most nebulae from home without sacrificing much of the signal.
We reviewed this filter in the past and loved it.
Now if you prefer galaxies or star clusters, some broadband filters exist, like the Optolong L-Pro for example which is a basic broadband light pollution filter. We... tried it and weren't the biggest fans.
The problem with light pollution filters, especially broadband, is that they BLOCK light. And this includes some light coming from your target. Your shots are also likely to have a weird, unnatural hue to them which can be challenging to fix during processing. We're not sure if everyone agrees with this or not but.. we actually don't recommend using filters at all when imaging some galaxies.

As an example, we imaged M94 from home with our OSC camera without any filters, and it turned out really well! We also tried doing the same on a different night, this time with a basic IR Cut filter, and it looked washed out. You can see the comparison in the video version of this guide at the bottom of this post!
We haven't tried with a light pollution filter, but we expect it would either look unnatural or washed out as well. We shall investigate this further in the future!
Below is the video about imaging the Cat's Eye Galaxy (M94) from our Bortle 9 backyard without any filters.
Tip 4: Pick the right target
Tip number 4! We kinda mentioned this already but... pick the right target! If you plan to capture an emission Nebula, it's best to use a narrowband filter when you shoot from home. If you do not have filters, pick a target that is large and bright. There are plenty of these in the Milky Way galaxy band, as well as the Orion constellation in Winter, and several other ones.
Some bright and large targets include:
The Rosette Nebula
The Orion Nebula
The Eagle Nebula
...And pretty much anywhere in Cygnus!
Tip 5: Use a Fast telescope or lens
This one can be applied to pretty much any aspect of astrophotography, but we think it's worth mentioning: Use a fast telescope, and if you do not have a telescope, use a fast DSLR lens!

Fast lenses like f/1.4 or f/1.8, or a fast telescope that is f/5 or under will help tremendously when imaging from home.
Using a fast instrument means you'll be able to get more data out of each frame you take, which will then have a great impact on your final result once stacking.
Our favorite fast lenses for DSLR astrophotography:
Tip 6: Don't forget about calibration frames and Dithering!
This is another tip that applies to all of astrophotography. You NEED to ensure that your calibration frames are taken properly. When imaging from home, you will already be dealing with a lot of unwanted noise, so using calibration frames (mostly darks and bias in this case) will help reduce noise and make your life easier when processing the data.
Dark frames: Take at least 15 shots using the exact same settings and temperatures as your lights, but keep the cover of the camera or the telescope on.
Bias frames: Do the same thing you did for the darks, except this time you just need to change one setting which is the exposure time, make it as fast as your camera will allow, and shoot a bunch of them. Bias frames are not needed when using an astronomy dedicated camera.

You should also take flats, but here in this case, bias and darks are the ones that really matter for the noise.
We take 15 calibration frames of each type nowadays, but we used to go crazy and take 200 to 300 in the past. These take forever to stack and we're not entirely sure if it worth taking so many. What we learned over the years is that 12 to 15 is an absolute minimum when it comes to calibration frames.
⚠️ Be sure to read our full guide about how to take calibration frames for astrophotography.
As for Dithering, this is another thing that is important to do during imaging so that you keep your noise situation as low as possible. We suggest dithering every 3 frames, which we feel like is the sweet spot. Dithering every single frame will waste too much time (due to the guiding having to settle each time) and dithering every 5 or 10+ frames will have a minimal impact.
Tip 7: Watch your Exposure Time and the Histogram!
For our last tip we want to talk about the histogram and what kind of exposure time you should take when imaging from the city!
You should always check your histogram, no matter where you image from. If you have no idea how to read your histogram, here are the basics, you want your main curve to be about 1/3 from the left, this will ensure that you can get the most out of your raw data during processing.
If you take a test shot and your curve is too much to the left, you are underexposed.
For this, you need to make your image brighter by either taking a longer exposure, making your ISO higher, or if using a lens, making your aperture wider.
If it's too much to the right, your image is overexposed.
So reduce your ISO or exposure time, or bring your F/number up!

From home, most people agree that stacking many short exposures is the way to go to obtain the best results.
It makes sense, because light pollution will easily overexposure your pictures, and stacking many different frames will help with noise. We actually tried imaging with 5min exposures (which is very long when imaging within the city) and without filters and honestly... the results were pretty good as you can see below!

So this will depend on your camera, and what settings you use. For this particular shot, we used a very low gain, 5-minute exposures, and an f/5 telescope.
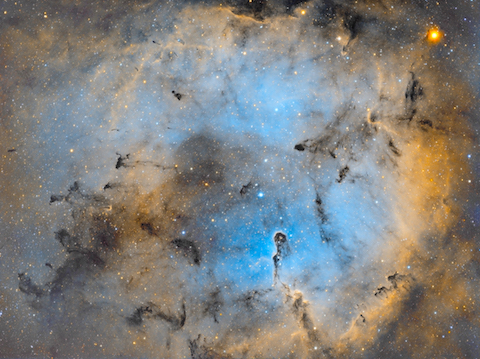
Example images taken from our light-polluted backyard
Below are just a few images we have taken from home in Las Vegas.


Want to learn all aspects of astrophotography in the most efficient way possible?
The Galactic Course includes a LIFETIME membership that gives you unlimited access to all current and upcoming astrophotography content. Step into an ever-growing realm of knowledge and learn at your own pace. Make life-long friends and connections with other members, and get tips from instructors that truly care about your journey and progress under the night sky.
Astrophotography from the City - Conclusion
So that's it, guys, as you learned, you can indeed do astrophotography from the city even under heavy light pollution! We truly hope that you learned something from this guide, and if we missed an essential tip that you feel is important, we'd love for you to share it with us in the comments!
Good luck imaging from home, and feel free to share your pictures on the Galactic Forum for all to see! It is a free forum where you can share whatever you want or ask questions.
We'll see you guys next time and clear skies.
Clear Skies,
Antoine & Dalia Grelin
Galactic Hunter
You might also like...

GALACTIC HUNTER BOOKS


How come your 5min exposures don't have long star trails?
Super tips, thanks a million. Ed from Waterdown, Ontario