
DwarfLab Dwarf 3 - The Smallest and Most Versatile Smart Telescope - Full review
- Antoine & Dalia Grelin
- Aug 12, 2025
- 10 min read
Updated: Feb 26

The Dwarflab DWARF 3 is the smallest, lightest, and most portable of all smart telescopes. Not only that, it also is packed with features that make it an awesome all-around smart telescope.
After reviewing the DWARF 2, I was impatient to try this new version when it came out, and I have honestly been very impressed by it.
In this review, I will go over all of the main aspects of this tiny smart telescope, and show you plenty of examples of what it can achieve in various modes. I have also created a premium course centered around the DWARF 3, where you can fully master the telescope thanks to the 92+ lessons that include tutorials, videos, and downloadables. Make sure to check this out if you plan to get a DWARF 3!

Table of Contents:
What's in the box?
Design and Dual Camera
Specs & Price
Size, Weight, and Mounting
How to Set Up the DWARF 3
Dwarflab App
Deep Sky Objects with the DWARF 3
Planetary, Lunar, and Solar Astrophotography with the DWARF 3
Daytime, Milky Way, Star Trails, and Panoramas with the DWARF 3
Stellar Studio
Final Verdict | Pros & Cons
DWARF 3: What's In The Box?
In the box I received:
The DWARF 3 Smart Telescope
A Carrying Bag
The Magnetic Solar Filters and its pouch
A USB-C Cable
A Wipe Cloth
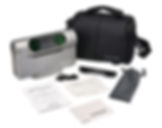
The Tripod

The Dwarf 3 is shipped in a small box that unfortunately doesn't include a tripod. You will need to either purchase a tripod (like the Dwarflab tripod which is excellent and not too pricy) or use any tripod you currently have at home.
The good thing is that you can attach the DWARF on any type of tripod, and it doesn't need to be sturdy or high quality as the telescope itself is so light!
The Carrying Pouch
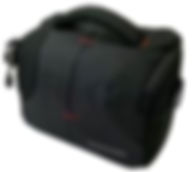
The DWARF 3 smart telescope comes with its own carrying bag, which great to have as it is perfect to carry the DWARF anywhere.
The telescope fits perfectly in there, along with its accessories.
The Battery
The average runtime of the battery is around 4-6 hours on a full charge. For comparison, the DWARF 2 battery lasts for 3-4 hours.

Charging the DWARF is very easy using the included USB-C charger.
The charging time is usually between 70 and 95 minutes. You can check either the Dwarflab app or look at the LED lights on the telescope to see the charging status.
And if you were wondering, yes, you can still use the DWARF 3 while it’s connected to a power source. You can also use a USB power bank to charge it.
Get the DWARF 3 Premium Online Course!
Completely master your DWARF 3 from A to Z with the DWARF 3 Smart Telescope Mastery course! This includes 96+ lessons (text, videos with commentary, downloadables...), it is available with closed captions in four languages, and goes through every single aspect of the DWARF 3 you can think of!

You can also get the Smart Telescopes Mastery Bundle, which includes not only the DWARF 3 course, but also, the Unistellar Telescope course, the Vaonis course, the ZWO Seestar course, the Smart Telescope Processing Guide, and extra downloadables!
The Filters
The DWARF 3 has 3 built-in filters, which is awesome because the filters for the DWARF 2 were physical, and not having to worry about manually changing filters and keeping dust off of them is a welcome upgrade.
The filters are:
The VIS filter which is used for daytime photography.
Wavelength covered: 430-650nm
The Astro Filter which is a light pollution filter, better known as CLS filter.
Wavelength covered: 430-690nm
And the Duo-band filter which should be used when shooting emission nebulae.
Wavelength covered: 656.3nm (HA) and 500.7nm (OIII)
If you’re a complete beginner and filters scare you, don’t worry because the DWARF will automatically decide on the best filter to use when slewing to a target, and so far it has always made the right choice for me so you can trust it!
The only filter that is still physical is the solar filter, which is very similar to the DWARF 2’s. It is magnetic and very easy to attach or remove.

DWARF 3: Specs and Price
Let's now go over the specs of the DWARF 3 smart telescope, and see how much does it cost.
The DWARF 3 telescope has a periscope design and comes with a Sony IMX 678 Stravis 2 sensor. It has two lenses, one wide-angle lens and one telephoto lens.
The wide-angle lens has a focal length of 45mm, an aperture of 3.4mm, and a resolution of 1920x1080. This lens is meant for either wide-field daytime photography, or to help you aim at your target manually at night. Aiming at bright objects like the moon or planets with this lens is very easy and quick.
The telephoto lens has a focal length of 737mm, an aperture of 35mm, and a resolution of 3840 x 2160. This lens is used for imaging deep sky objects, panoramas, lunar, solar, or for close-up daytime shots if you are for example into bird photography.

The DWARF 3 telescope has built-in Bluetooth and WiFi, and can save images as .PNG or .FITS if you'd like to process the data yourself on your computer. You can either transfer your files to your computer wirelessly, or using the USB-C cable, which is what I prefer as it is so quick and easy to do.
Connecting to the DWARF 3 is easy, and can be done through the DWARF's direct connection, or through "STA Mode" which means through your home's WiFi. This is great to extend the range and have a very stable connection if you mostly image from home.
At the time of writing this review, the DWARF 3 costs $549 + tax in the United States and costs 529 € in Europe.
Size, Weight & Setup of the DWARF 3
Weight: 2.86 lb (1.3 kg)
Height: 5.6 in (142 mm)
Width: 2.6 in (65 mm)
Length: 8.7 in (222 mm)

The DWARF 3 is the smallest and lightest of today's smart telescopes. It easily fit in any bag, including the pouch it comes with, and is a breeze to travel with.
Taking the DWARF 3 with you on a bike ride, a hike, or on vacation is such a pleasure, and there is always something to shoot with it, day or night!
How to set up the DWARF 3?
Just like the DWARF 2, it only takes seconds to set up the DWARF 3 telescope and start using it. Simply:
Get the unit and the tripod out of the bag, and screw in your tripod to the base of the telescope.
Set the telescope on the ground.
Make sure the ground where you placed the telescope is level. You can use your phone or a bubble level to check this.
Press the power button on the side once to turn the telescope on.
You can then connect to the DWARF using the Dwarflab App on your phone!
Controlling the DWARF 3 with your Phone
The DWARF 3 is a smart telescope, and is meant to be used with your phone or tablet through an app. I have already went through the Dwarflab app in depth in my DWARF 2 review a couple of years ago, so I won't go too deep here.
The DwarfLab app is free and has four tabs:
Home
This is where you can connect to your telescope, enter the Imaging mode, see your scheduled targets if any, and activate/deactivate the Ring and Battery indicator lights.
Atlas
The second tab is Star Atlas. This is like a planetarium program where you are able to look at the sky in real time, see the targets, zoom in, and much more.
Album
Here you can see all of the pictures and videos you shot with the telescope. You can also save them on your phone, or delete them.
Settings
The last main tab of the app is the Settings tab. Here you'll have access to all of the main settings for the app and telescope, as well as advanced settings.

The Imaging interface can be accessed once you connect to the DWARF and tap "Photo" on the home tab. That interface can feel overwhelming at first due to all the different icons visible all around, but you'll quickly get the hang of it and find a use for every single feature!
All the pictures you will see below have their own lesson tutorials on the DWARF 3 Smart Telescope Course!
Deep Sky Astrophotography with the DWARF 3 Smart Telescope
I shot several Deep Sky Objects with the DWARF 3, including galaxies and nebulae. I also tried the mosaic feature which works great, AND the EQ Mode feature.
Remember that with the DWARF 2, at least when I had it, you had to use a straw to polar align. With the DWARF 3, EQ Mode can be achieved in just a couple of minutes and it’s honestly very easy. With EQ mode activated, you can shoot 60 second exposures and not be limited to 15 seconds max. The Veil Nebula below was taken using 60 second exposures, and as you can see, the stars are round and pinpoint thanks to EQ mode.

Be sure to watch the review video at the bottom of this post, or go through the course to see all other DSOs I shot with the DWARF 3!
Planetary, Lunar, and Solar Imaging with the DWARF 3
After deep sky objects, let's now try the DWARF 3 on planets, the moon, and the sun!
Jupiter using the DWARF 3

Jupiter, like other planets, does not look good with the DWARF 3. Smart telescopes don't do a good job at capturing planets, and that's simply because of their small size. At least, you can see the planet and three of its moons, which is still cool!
I yet have to try the stacking feature for planetary, but must wait for either Jupiter or Saturn to be up in the sky again.
The Moon using the DWARF 3

The moon with the DWARF 3 can be either "meh" or very impressive.
Taking a single shot of the moon will give you an image that is not very impressive, and lacking details. What you must ensure to do is to stack a few frames using the built-in Lunar Stacking feature.
With just 10 stacks, which takes a couple of minutes, the moon looks much, much better than a single shot! I would say I am impressed with the details and overall picture considering how quick it was to achieve.
The Sun Using the DWARF 3

Important: The solar filters need to be attached to the DWARF 3. Don't point it at the sun unless both lenses are protected by the filters!
Like the moon, the sun was very easy to capture with the DWARF 3 telescope, and I got a very impressive result here as well.
You can see several sun spots in this 50-frame Solar Stack.
Milky Way, Panoramas, Star Trails, Daytime Photography...
Let's now cover other types of imaging you can do with the DWARF 3, because yes, it is so versatile that you can shoot pretty much anything!
The Milky Way with the DWARF 3

You can shoot the Milky Way with the wide angle lens and it looks great! Be sure to activate EQ mode so that you can take long enough exposures. You’ll of course get a better result with a good DSLR and lens, but for a smart telescope shooting this wide, it’s fantastic to be able to snap the Milky Way band.
Panoramas with the DWARF 3

Being able to shoot panoramas is awesome if you live somewhere with open fields or go on hikes often.
Panorama mode will use the telephoto lens to stitch dozens of shots together and create a beautiful wide field image where you can zoom and still retain high quality.
Star Trails

Star Trails can be shot with either the wide angle or the telephoto lens. They're done using the "Burst" mode and are overall very simple to achieve.
You'll simply need to import your files to your computer and combine them using Photoshop, StarStaX, or other.
Daytime Photography
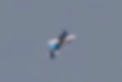
Daytime photography is something I never thought I would enjoy doing with a smart telescope, but sitting on a chair outside and slewing the telescope around is actually so relaxing.
I was able to get some nice shots of bees, flowers, landscapes, and… a plane doing acrobatics which I love so much. You can also shoot time-lapses, which is nice for sunsets, moving clouds, and more.
Stellar Studio
If you don’t like processing your pictures yourself, there is a feature built into the app that can enhance your images very quickly and easily, it is called Stellar Studio. You can access that from the gallery and pick any of the pictures that you took. In Stellar Studio, you can fix your stars' shapes, reduce noise, and enhance details.

The four editing options are:
Auto
This works very well and will overall enhance your image in every way!
Star Correction
This will fix the shape of your stars and ensure they are round.
Denoise
This will remove noise and make your image cleaner.
Star Removal
This will remove all of the stars to give you a starless version of your image.
If you prefer to process your pics on the computer, which is what I like of course, you can easily transfer your Master file (or all your single frames) to it either through the USB cable, which is in my opinion faster and easier, or wirelessly.
Final Verdict
I have been very impressed with the DWARF 3. Taking it on random bike rides or hikes is great and I feel like there is always an opportunity to get something great out of it no matter what i want to shoot.
Like I said earlier, I have just released a full online course about the DWARF 3 which will help you get the very best out of the telescope so please check it out. It has so many lessons and will likely still grow over time. There is also a bundle available which is the DWARF course + the Unistellar scope course + the Vaonis and ZWO Seestar courses. It also includes the Smart Telescope processing guide, the Messier catalog template, and access to the Galactic Lounge.

The DWARF 3 is the smallest yet most versatile smart telescope. It is super quick to setup, easy to use, and fits anywhere! Its dual-lens system is what makes the telescope so versatile and able to capture pretty much any type of image you can think of. The wide-angle lens is useful for slewing to the moon or planets, daytime photography, or framing any object before switching to the telephoto lens for astrophotography. The built-in filters are such a nice upgrade from the DWARF 2, just like its EQ mode, mosaic feature, or built-in stacking which all work flawlessly every single time.
Of course, image quality still can’t match a dedicated astrophotography rig, and planets or certain deep-sky targets are still a bit too challenging for the small unit, but that doesn't stop it from being an incredible scope.
Interested in getting the DWARF 3?
If you would like to purchase this product, you can do so at Agena Astro! The DWARF 3 is also sold on Amazon.
If you already own this and have taken some great images with it, attach them to the comments section of this post so we can all see your work!
If smart telescopes are not the right product for you, but you are motivated to start Astrophotography, check out our complete guide on beginner astrophotography equipment!
Clear Skies,
Antoine & Dalia Grelin
Galactic Hunter
GALACTIC HUNTER BOOKS


