Stellina - The Future of Astrophotography? Full review
- Antoine & Dalia Grelin

- Nov 3, 2019
- 17 min read
Updated: Jun 9, 2023
Is this... the future?
Stellina is a revolutionary Astrophotography instrument that fits in a backpack and can take beautiful photos of deep sky objects using an app on your mobile device.
It only takes a few minutes to set up, does not have to be polar aligned, and will recalibrate itself if moved around during imaging.
In this review, we will tell you everything you need to know about this product and see if it is worth the price. What kind of images can we get and how does it compare with a regular Astrophotography set up? Let's see how Stellina performs far from city lights in Death Valley National Park. Then, push its limits from the most light polluted city on Earth: Las Vegas.
⚠️ Note: A cheaper and smaller version is now available called Vespera, which we reviewed here. We prefer Vespera over Stellina!

Stellina is designed and built by French start-up company, Vaonis. The 10-15 person team working on the project are dedicated to making Astrophotography more accessible to everyone. So what's the key difference between Stellina and a regular telescope? Well, it does not have an eyepiece! Stellina is controlled with a smartphone or tablet, through an app called Stellinapp. The app takes care of initializing Stellina, slews to your desired target from its catalogue of objects, and automatically stacks and processes your images in real time! We will go more in depth about the app later in this review. So far, we're impressed.
We first met Stellina at CES 2018. You might remember our video about the Astronomy Innovations at CES 2018 or our post about our first impressions of Stellina.
Back then, we were really intrigued by the sleek design, the lack of buttons, and the promised ease of use of this Astrophotography instrument. We left the Consumer Electronic Show with nice memories, but also still lots of questions.
In our written post, we wished that perhaps one day we would be able to try out Stellina on our own to see if it was not too good to be true. Well, that day has finally arrived.

During our 2019 summer vacation in France, I, Antoine, decided to leave my rainy farm in the north to visit Montpellier, a beautiful city by the beach in the south of France. Coincidentally, it is also where Vaonis' offices are located!
Vaonis got in touch with me and were kind enough to invite me to try out Stellina for two nights. I learned a lot about the product, and was, honestly, completely blown away by it.
We were able to photograph deep sky objects from downtown Montpellier and it took us only moments to take Stellina out of the trunk and start imaging!
After we returned to Las Vegas, Vaonis offered to send us a Stellina so that we could show you guys what it is capable of. Although we have a good relationship with Vaonis, this review will be 100% honest, and if there is something we don't like, we'll be sure to include it!
You can find our full review video at the bottom of this page, as well as a gallery of images taken by Stellina.
What's In The Box?
Stellina and its accessory parts are shipped in one big box. Once opened, Stellina can be found in the main box, while the tripod and accessories are packaged in a smaller box. Our first thought was that it felt strange because everything you need to do astrophotography is in front of your eyes, in just one big box. We had flashbacks of when we first bought all of our own astrophotography equipment and received everything in multiple boxes over several days. One for the mount, the other for the telescope, others for the power, the coma corrector, the camera, and all the other accessories… 4 years later, this felt unreal.
In the main box we received:
Stellina
A protective sleeve
A welcome letter
In the smaller box:
The tripod
The tripod's pouch
The tripod's manual
The tripod's Allen keys (which you don't need for Stellina itself)
A bubble level
Two batteries
Six lens cleaners
The Tripod
The Tripod that comes with Stellina is manufactured by the Italian brand Gitzo, a renowned photography tripod company. It is a Gitzo Series-3 Systematic Tripod, and the company advertises it as the strongest and most stable photography tripod in the world. It is made of carbon fiber and aluminum, and felt extremely sturdy when we extended its legs for the first time. You can see Antoine's reaction in our unboxing video.
The tripod weighs 4.25 pounds and can support a payload of 55 pounds. When fully contracted, the tripod is small enough that it can fit in a regular sized backpack. The Allen keys that come with the tripod are only needed if you plan on making modifications to the tripod (for example, if you want to change the legs or add a ball head). You will not have a use for these tools if you plan to use the tripod solely with Stellina. As for the bubble level, it goes between the telescope and the tripod. It screws in at the bottom of Stellina and can remain attached, even when it is not in use.
The Batteries

Stellina comes with two small power bank batteries that fit perfectly inside of the telescope's battery compartment.
Realistically, you can use any battery of your choice, as long as it is an external battery with a USB Type-C connector. If imaging from your backyard, you could even plug it directly into a wall outlet by using an external power adapter.
The two batteries that come with Stellina can last about 5 hours each, although during our last outing, we only used one battery and it lasted for 6 hours. We do not see a need to upgrade to other batteries as the ones provided can last 10+ hours on the field, which is more than a full night. When not in use, the batteries that come in the box also have a cool little feature that can be helpful when packing up after a long night: They have their own flashlight built into them!
The Box

How do you carry Stellina around?
Vaonis gave us a Patagonia backpack made specifically for carrying Stellina, which should be available soon on their website.
If you do not wish to spend extra on a backpack, you can easily carry Stellina around in the box it came in! Vaonis had the innovative idea to add a strong handle to the top of the box, allowing you to carry Stellina and its accessories safely.
Specs & Price
Let's talk about the specifications of Stellina and its retail price. The lens is an Apochromatic ED doublet with lanthanum glass, meaning there will be little to no chromatic aberration, and the colors of the stars will be natural. Stellina has an aperture of 80mm (3.15 in) and a focal length of 400mm (15.75 in). It is pretty fast with a focal ratio of f/5.
It comes with a IMX 178 CMOS Sony sensor that has a resolution of 6.4 Million pixels (3096 x 2080 pixels). It has a magnification of x50 from the 1° x 07° field of view. A light pollution filter is included and located right in front of the camera sensor. Stellina also has an integrated field derotator which automatically adapts depending on the target.

Stellina can save the images in .JPEG format directly to your mobile device, or in a16-bit FITS raw file if you have a USB flash drive. It does not require polar alignment and any kind of alignment is done automatically with star field recognition (or plate solving). Because Stellina uses an Alt-azimuth mount, it has an integrated field derotator for longer exposure shots without apparent star trailing.
Stellina only has one button: the ON/OFF power button. It also does not have any kind of focuser. Focusing is achieved automatically by the onboard computer and rectifies itself if there is a drop in temperature during the night. Stellina also has its own dew heater, which activates automatically if it senses humidity on the optic system. And, the icing on the cake? It also has a rain sensor function which will make the computer system close the telescope to protect the lens when the weather becomes rainy.
At the time of writing this review, Stellina costs $3,999 + tax in the United States. It costs 3 999 € in Europe.

Size, Weight, and SetUp
Weight: 24.7 lb
Height: 19 in
Width: 15 in
Depth: 4.7 in
Stellina weighs 24.7 pounds (11.2 kilograms) and has a size of 19 x 15 x 4.7 inches (49 x 39 x 13 centimeters). Both the telescope and its accessories can fit in a large backpack and can be taken as a carry-on on a plane! It does feel heavy if carried for an extended amount of time, for example, if you plan to bringing it on a hike. On the other hand, having the ability to set it up anywhere is gratifying enough and worth it!
How to set up Stellina?
Installing Stellina is, without exaggeration, about 100 times easier than setting up a regular Astrophotography rig. The time it takes between the moment you put the tripod down and when you start imaging is significantly less than with what we are used to (our 8" Astrograph, Atlas EQ-G, ASI 1600MM and all the accessories...).
First, take the tripod out of its protective sleeve and place it anywhere on the ground. You can choose to extend the legs or not. We take precaution and do not extend the legs, as we feel keeping it close to the ground is safer in case of wind.

Next, grab Stellina firmly and set it on the tripod gently, you should hear a "click" sound when it has successfully attached to the tripod.
Use the knob on the side of the tripod to tighten the grip between the tripod and Stellina.
Now, check that the bubble level is centered, ensuring that you are on flat ground.
Lastly, open up the battery compartment and plug in one of the batteries. If you are using a battery that came in the box, it should fit inside and you can close the compartment.
That's it! Your Stellina is now properly set up and ready to be used. Launch the app on your mobile device and simply follow the instructions to start photographing deep sky objects. We have an in-depth step-by-step guide on how to use Stellina on our website as well as a short tutorial video on the subject on our YouTube channel. [Available soon].
StellinApp (Now "Singularity")
Once again, Stellina does not have an eyepiece, so everything occurs on your mobile device. The free app that can control the observation station is called "Stellinapp". It is easy to use, user friendly, and full of information. It also has a great feature for group activities, which we'll talk about below.
The app is made up of 4 tabs. The first is the Initialization tab, which connects to Stellina and begins the auto-initialization process. You only need to use this menu when you are powering on the telescope. You may need to go back to this tab in the unlikely event that your device loses connection (walking far away for example), but this would not affect the imaging flow.

The second tab is the Catalogue. This tab lists all the objects currently available in Stellina's computer. You do not have to power Stellina on to browse the catalogue, which is useful when you want to plan out your night beforehand. You may see colored dots on each object, these will tell you what target the app recommends at the present time or if you should wait to image it.
A green dot means the object is high in the sky and can be imaged for a while.
An orange dot either means the target is rising or is about to set, but is low on the horizon.
A red dot means the object is not visible at the moment and is below the horizon.
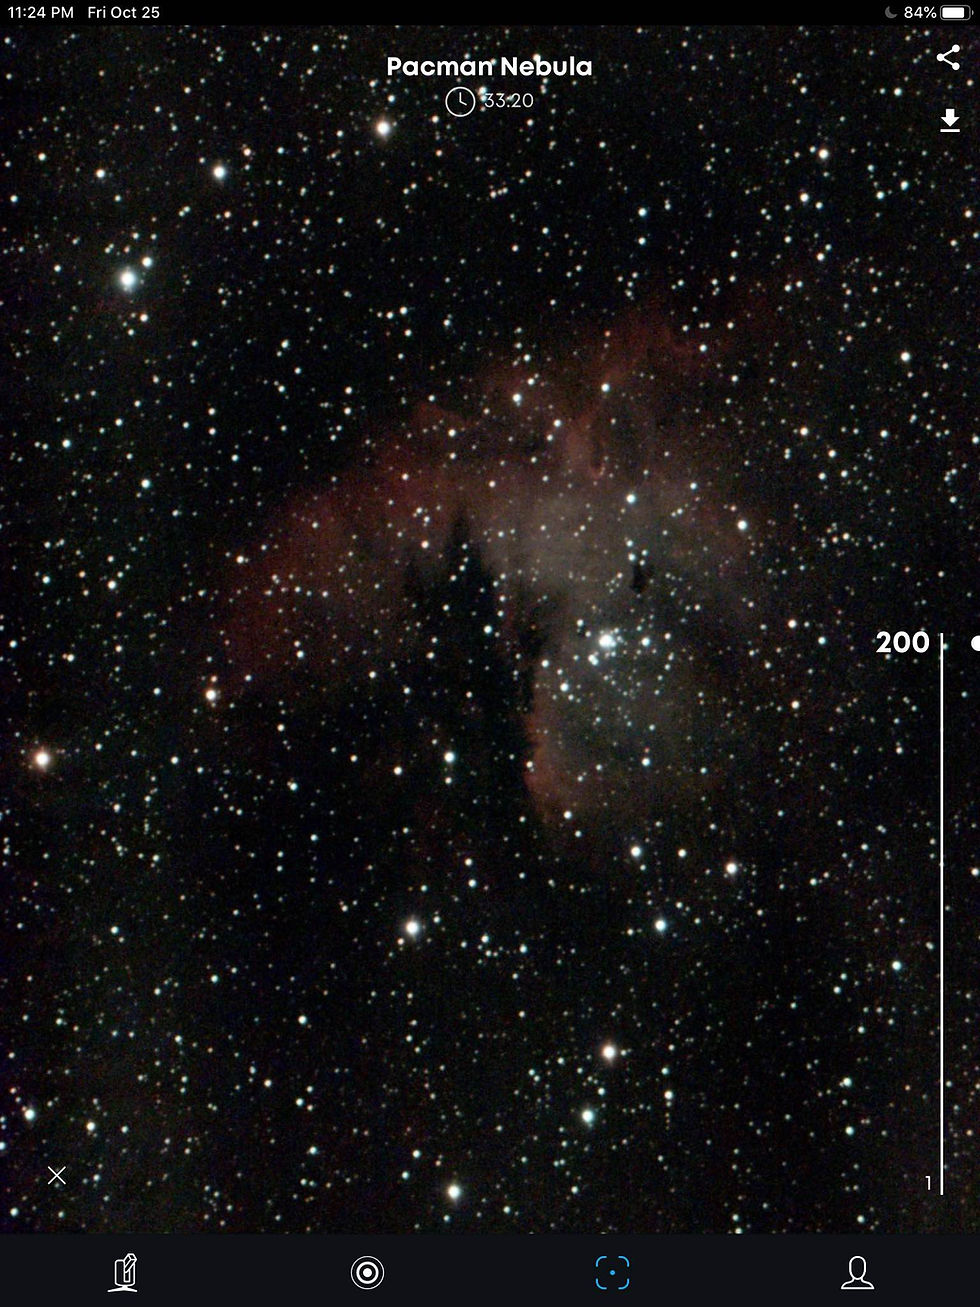
The third tab is for Imaging.
This is the main hub while photographing deep sky objects. It is where the live stacking occurs and where you will see your astrophotography come to life.
On this screen you can see the name of your current target, the total exposure time since first slewing to it, a slider tracking your progress every 10 seconds, and buttons to download your result, or share the image with the world.
The slider (visible to the right) is very fun to use as you can see the progress made on the image since the very beginning. It is also great to show others the very first frame, and quickly slide to the last and listen to all the "wows" coming out of their mouth.
The last tab is the Profile tab. Here you will see your bookmarks, if you have any, and a list of all your previous observations made with Stellina, if you decided to save them through the app. You will also find the settings where you can activate night mode, read the FAQ, or log out.
Let's talk about the group feature!
If you are using your Stellina in a group setting (school, family, astronomy outreach…), up to 20 people in range of the telescope's WiFi can simultaneously connect to it. They will see what is happening on your screen from their own mobile device, as long as they have downloaded the app. Each member can connect to Stellina through the app and see the live stacking occur right in front of their eyes, and can even share and save the images on their personal devices! The owner of Stellina can also give control to any person in the group and allow them slew the telescope.
We believe this is an awesome feature that has huge social and educational benefits.

Comparing Stellina from Two Different Bortle Zones

STELLINA FROM DEATH VALLEY
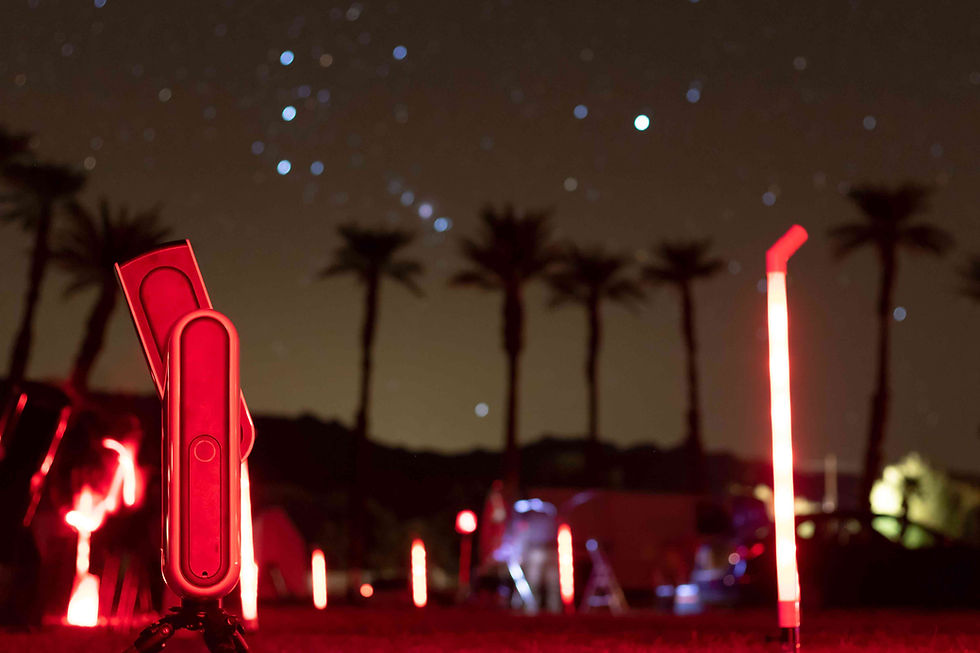
In October, on the night of the new moon, we made our way to one of the darkest locations in the United States: Death Valley. We attended a star party with the Las Vegas Astronomical Society. Most areas in Death Valley are Bortle 1 / Bortle 2 zones, and we were in between these two zones that night.
We met with a few members of the club and set up our Stellina in minutes. With the Milky Way illuminating over us, we knew it was finally dark enough and chose our targets. We decided to photograph three targets throughout the night while still interacting with the people attending the star party. All of which turned out beautiful, especially for the low total exposure time (between 10 and 30 minutes for each).
You can see the results below with some information. Click on the thumbnails to the right to get a better view of all three targets!
1) The Dumbbell Nebula (M27)
Total exposure time: 12 minutes
You can clearly see the "X" in M27, which we had trouble bringing out when we were beginners attempting the object with our old Canon t3i DSLR camera.
2) The Pacman Nebula (NGC 281)
Total exposure time: 30 minutes
The Pacman Nebula was impressive, although this target is better captured with narrowband Ha and OIII filters. With Stellina, you can even spot the dark dust lane as well as the cluster within.
3) The Orion Nebula (M42)
Total exposure time: 10 minutes and 20 seconds
Lastly, the famous Orion Nebula looks fantastic and very clean. You can see some of the outer gas which is much fainter than the gas around the core. M43 is also clearly visible on the left.
Below you can see screenshots showing a 10-second exposure of Messier 42, and another one taken 10 minutes later after 62 frames have been stacked, bringing the total exposure time to 10 minutes and 20 seconds. As you can see, the second image brings up much more gas and the stacking took the noise away.
We spent most of the night showing Stellina to the club members and star party attendees, so we did not spend a lot of time on one specific target, but one thing is certain, we are impressed! Our only regret was not having brought a USB flash drive to save the raw files and process them better on our computer back home.
STELLINA FROM the LAS VEGAS Strip
A few days later, we decided to tried out Stellina from a very light polluted area: the Las Vegas Strip. What better obstacle for Stellina to be tested in than the City of Lights? Can we push it to the limit?
We set up Stellina on top of a parking garage on the Las Vegas Strip, and, after begging the security guard to let us stay for 15 minutes, were able to start imaging. Orion was not high enough yet and with time being of the essence, we chose to photograph M27, so that we could compare the results with what we got at Death Valley. The only stars we could see from there were the ones forming the Summer Triangle, and we truly did not believe the telescope would even be able to find stars to calibrate itself in the first place.
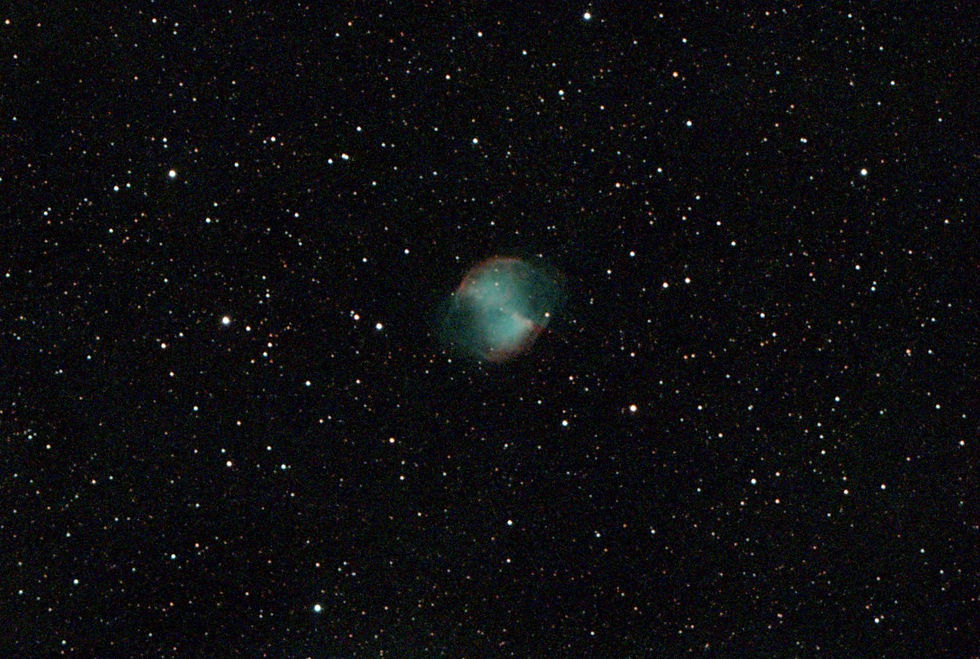
However, Stellina is equipped with a City Light Suppression filter (CLS) that sits just in front of the camera sensor. As you can see on the image above, it did its job perfectly! We were very impressed when the first frame showed up on our phone, and it did not cease to amaze us as the live stacking continued to show better results every 10 seconds. Sadly, we did not have time to try another target, as we promised the security guard we would be out of there within 15 minutes, but we successfully proved that Stellina can be used even from an extremely light polluted area!
Lunar and Planetary Photography with Stellina
Vaonis markets Stellina as a deep sky imaging instrument, and mentioned to me back in Montpellier that it wasn't really made for planetary imaging. I wanted to judge that for myself and pointed it towards Saturn and Jupiter. I was able to see Saturn's rings and Jupiter's band pretty easily, although it was very small. I sadly did not keep the pictures taken of the planets but will try to add new ones to this post if I am able to get these planets again before they are too low in the horizon.
I then slewed it towards the Moon and was able to photograph our satellite. While on the moon, I asked Vaonis' CEO if the computer could just grab any image from a database and "trick" the user to make them think it was a real-time image. The moon not being very high in the sky, he replied with "go stand in front of Stellina right now and you'll see". When I was in front of Stellina, I was able to see on the ipad view that the light coming from the object was blocked by my body.

Final Verdict
What is our final verdict on the Stellina Observation Station? What do we like? What do we dislike? Most importantly, is Stellina a good investment for you?

Personally, we think having Stellina as a secondary Astrophotography device is superb. We don't mind adding an extra bag to our current equipment because we know it won't hinder our primary goal. We love being able to set it up in 2 minutes. Having Stellina focus on a secondary target is a dream because it's a time-saver; and if our primary mount failed us, at least we would still manage to get images without feeling like we wasted our time driving out of the city. We also enjoy the fact that when we meet curious passersby or other astronomy enthusiasts out on the field, we can now easily show them targets in real time without having to pause our bigger Astrophotography rig.
On the other hand, Stellina is not for everyone. Advanced astrophotographers who prefer to do astrophotography "the good ol' way" might see Stellina as a "Millennial toy that is too easy to use with a grotesque price tag as you could build 7 different rigs yourself with that money". We actually agree on the "too easy" part. Spending hours on imaging and processing a target yourself, and exporting that final image you worked so hard on is just so rewarding and magical. If Stellina is a taste of the future, then we'll be getting incredible astrophotographs from our phones with a similar product in 10 or 20 years from now. And that's kind of scary.
As for the price, $4,000 does sound like a lot at first glance, but what about your current gear? If you own a full astrophotography rig, add the price of every piece you purchased to build that setup, that number is likely to equal Stellina's price. It is also more than likely that your current gear produces much better images, but lacks the smart features and portability of that little scope.

Should YOU get Stellina?
In our opinion, Stellina is perfect for you if:
You do not already own astrophotography equipment and do not plan to for a while
You already own an astrophotography set up but would like an additional device on the side that is quick and easy to use
You often have group events or guests at home and want a fun and educational experience
You travel a lot and would like to image the stars wherever you go
Here are what we believe are the main positive and negative points about Stellina:
POSITIVES:
Quick to set up
Stellina and its tripod are the only parts you need to start imaging. The battery fits nicely inside its own compartment, and the bubble level never needs to be de-attached after screwing it on.
Its ease of use
Stellina calibrates itself automatically, no polar alignment nor star alignment is required, and it even does the stacking and processing automatically! We believe a child could use this telescope and learn about deep sky objects and astronomy without being supervised or helped by an adult.
Its portability
Stellina fits in backpacks, vehicles, in overhead bin of airplanes. Unlike a regular Astrophotography setup, you can pretty much take Stellina wherever you go, and that's awesome.
StellinApp
The app is user friendly and fun to use. It comes for free and is often updated with new targets. It is great to plan the night as each object page is full of interesting information. We have used the app many times over the past few weeks and it has never crashed.
NEGATIVES:
It won't beat a full Astrophotography set up in terms of image quality
Do not expect Stellina to yield Hubble-like results, especially if you are an advanced astrophotographer. Several objects from the catalogue, especially some busy star clusters, do not look very good when photographed with Stellina, even with stacking.
The protective sleeve is very slippery
This is only important when packing up as you are likely to put the sleeve back on the product, then take Stellina off its tripod and bring it back to your car or to its box. Make sure you do not drop it as the sleeve can slide off easily.
Does not do well when windy
Although it helps to be low to the ground, the wind may affect Stellina more than you may think. The telescope is clipped and tightened to the tripod, but there is still a tiny bit of wiggle room. Thankfully, the app will automatically ignore frames with apparent star trails when stacking.
Stars can become bloated after hundreds of frames stacked.
You may see this in our two comparison images of Messier 42 above. Take a look at the stars between the 10 second frame and the 10 minutes image. The stars especially the bright ones, get bloated quite easily when stacked over a long period of time. This could easily be fixed if you process the image on your computer later (by running a Morphological Transformation Process in PixInsight for example), but it can get annoying for someone who does not wish to edit the image at all after downloading it on their device. This only becomes a problem if you plan on spending several hours on a target though.
Interested in adding Stellina to your equipment?
If you would like to purchase this product, you can do so at High Point Scientific!
If you already own this and have taken some great images with it, attach them to the comments section of this post so we can all see your work!
If Stellina is not the right product for you, but you are motivated to start Astrophotography, check out our complete guide on beginner astrophotography equipment!
Example Images Obtained with Stellina
Below you will find a gallery with all the targets we photographed with Stellina. It will be continuously updated as we capture more of the Universe with this little instrument. Unlike our usual astrophotographs which are usually 3 or 4 hours of total exposures, all the photos below were taken in just a few minutes, besides M33 (30 minutes) and the Bubble Nebula (1 hour)
M33
The Triangulum Galaxy
Total Exposure Time: 30 minutes
Bortle Zone: 4
M13
The Hercules Cluster
Total Exposure Time: 5 minutes
Bortle Zone: 4
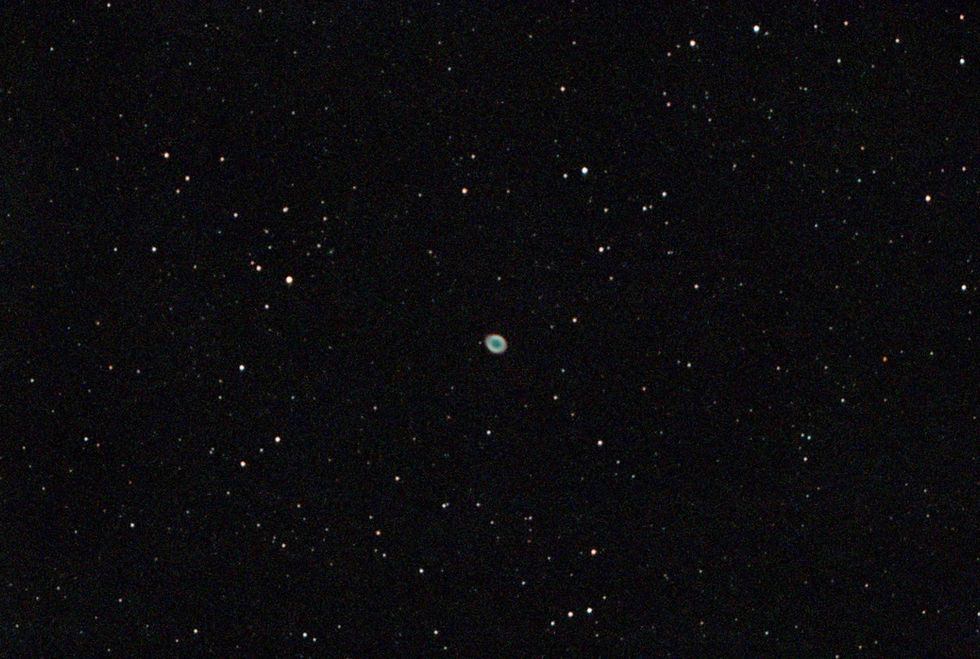
M57
The Ring Nebula
Total Exposure Time: 2 minutes
Bortle Zone: 4
Our Full Review Video of Stellina
If you'd like to see Stellina in action and see us image with it from Death Valley and the Las Vegas Strip, watch our full review video below!
Clear Skies,
Antoine & Dalia Grelin
Galactic Hunter
You might also like...
GALACTIC HUNTER BOOKS

Description: Discover 60 Deep Sky Objects that will considerably improve your Imaging and Processing skills! Whether you are a beginner, intermediate, or advanced astrophotographer, this detailed book of the best deep sky objects will serve as a personal guide for years to come! Discover which star clusters, nebulae, and galaxies are the easiest and most impressive to photograph for each season. Learn how to find each object in the night sky, and read our recommendations on imaging them in a quick and comprehensive way. Each target in this guide contains our advice on imaging, photos of expected results, and a useful information table. We've also included a few cool facts about each target, a map to find it in the night sky, and more!

Description: The Astrophotographer’s Journal is a portable notebook created for the purpose of recording observations, cataloguing photographs, and writing down the wonderful memories created by this hobby.
This book contains more than 200 pages to memorialize your stargazing and imaging sessions, as well as a useful chart on the last pages to index exciting or important notes.
Read back on the logs to see how much progress you have made through the months, the problems you overcame, and the notes taken to improve in the future. Just as the pioneers of astronomy did in their time, look up and take notes of your observations as you are the author of this star-filled journey.

Description: The Constellations Handbook is a logical guide to learning the 88 constellations.
Learning the constellations is difficult. Remembering them is even harder.
Have you ever wanted to look up to the night sky, name any pattern of stars and be able to tell their stories?
This book groups the constellations in a logical order, so that the reader can easily learn them by their origin, and see how their stories interact with one another as a group.
The last pages of this book include an index of all 88 constellations, each with a slot where you can write your own personal tips and tricks in order to memorize them with ease.
The Constellations Handbook is not just another guide listing all the constellations from A to Z and their location, it is the perfect companion for stargazing, and a learning journey through the ages.














Comments