


SeeStar S50 Pro - The Most Advanced Smart Telescope From ZWO - Full review

Updated: Aug 26

After releasing the Seestar S30 Pro smart telescope, ZWO is now selling the Pro version of the S50!
The Seestar S50 Pro is an upgraded S50. It can finally shoot in 4K, has a double-lens system, a better battery, and has a more features.
The S50 Pro is still rather small, simple to use, and keeps an affordable price tag as an entry-level telescope. The question is: Would an upgrade be worth it if you already own a smart telescope?
In this review, I will go through everything you need to know about the ZWO Seestar S50 Pro and show you what it can actually do. My goal by the end of this post is for you to know exactly whether or not this telescope belongs in your home.

Table of Contents:
What's in the box?
Specs & Price
Size, Weight, and Mounting
Seestar App
Deep Sky Objects Captured with Seestar
Planetary, Lunar, and Solar Astrophotography with Seestar
Seestar S50 Vs. Seestar S50 Pro
Final Verdict | Pros & Cons
Seestar S50 Pro: What's In The Box?
Just like the other smart telescopes from ZWO, the Seestar S50 Pro arrives to your home in a single box. Inside, you'll find a Seestar carrying case, which includes the telescope itself, of course, and the tripod. The case can also fit the solar filter and a charging cable, which means you can carry everything you need around in this one single case.
Everything that is included in the box is listed below:
The ZWO Seestar S50 Pro
A Tripod
A Solar Filter
A Carrying Case
A USB Type-C Charging Cable
A Manual
ZWO Stickers

The charging cable does not include a wall adapter, so you'll need to plug the USB end into your own wall brick. That is the norm nowadays anyway, so no surprise here.
The Tripod

The Tripod that comes with the S50 Pro is the same as the one that is included with the original S50. It is the ZWO TC20 tripod, a smaller version of the TC40 shipped with the ZWO harmonic drive mounts.
It is small with a total length of 274.5mm (10.8 inches) and can be extended up to 363mm (14.29 inches)
By itself, this tripod costs $99. I also strongly suggest purchasing the panoramic fluid head, which will help you use EQ Mode easily. The ZWO one is $99, but I personally use this one from Amazon which is under $40.
The Battery
The Seestar S50 Pro has a 10Ah Lithium-Ion battery with an average runtime of 9 hours. For comparison, the original S50 battery lasts for 6 hours.
To charge the S50 Pro, plug in the included USB-C cable and wait approximately 2 to 3 hours.
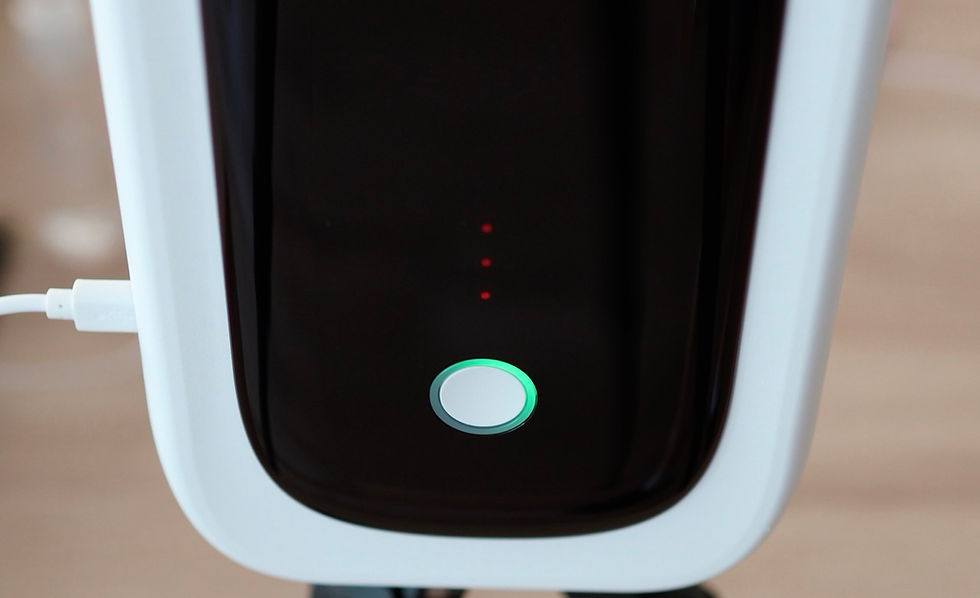
You can see the progress of the charge with the green LED lights above the power button (4 still lights means fully charged) or check the exact percentage on the Seestar app.
If needed, you can image with the S50 Pro while it's plugged in and charging. You can also use a USB power bank.
The Filters
The Seestar S50 Pro smart telescopes has two built-in filters and one physical filter.
They are:
The UV/IR Cut filter (Built-in)
This filter will help you get better looking stars and more visually pleasing images overall.
Wavelength covered: 400-700nm

The Duo-band filter (Built-in)
This is a dual narrowband filter which should be used when shooting emission nebulae.
Wavelength covered: 30nm of bandwidth for OIII (495nm - 515nm) and 20mm for HA (646nm - 666nm)

The Solar filter (Physical)
This will of course be used to protect your lens from the sun when pointing at it. It is a magnetic filter that is very simple to attach and remove.
A dark filter is also built-in the telescope, which allows the Seestar to take calibration frames whenever needed. You do not need to worry about manually using the dark filter.
Actually, if you're a total beginner, you don't need to get stressed out about the different built-in filters anyway, because the Seestar app will pick the best filter for you depending on the target you are imaging!
Seestar S50 Pro Design and Dual Camera
ZWO is overall sticking to their original smart telescope design for all the models they are releasing (S30, S30 Pro, S50, S50 Pro...).
The Seestar S50 Pro still is longer in height, and has an arm that opens up to the sky. The S50 Pro rotates on its base when slewing, and can be set to either Alt-Az or EQ mode. It has a single button, which is used to power it ON or OFF. 4 LED lights are displayed above the button, as well as a rotating light around it. These lights give us clues as to what the telescope is doing (charging, low battery, EQ mode, etc...). Lastly, the telescope has one port which is on its side. It is used to plug in the USB-C cable, either for charging or for transferring files to a computer.
When the arm opens up, it reveals the Seestar's lens. Or in this case, its two lenses! Indeed, the S50 Pro has, like the S30 Pro, a double lens system. And in case you were wondering, both are in 4K resolution!
The second lens is a wide-angle lens, which unlocks a ton of features that would not be possible on the original S50. For example, you can use the wide-angle lens to shoot the Milky Way or star trails.
Get the ZWO Seestar Premium Online Course!
Completely master your Seestar from A to Z with the ZWO Seestar Smart Telescope Mastery course!
This includes 130+ lessons (text, videos with commentary, downloadables...), it is available with closed captions in four languages, and goes through every single aspect of the Seestar you can think of!

You can also get the Smart Telescopes Mastery Bundle, which includes not only the Seestar course, but also the Dwarflab course, the Unistellar Telescope course, the Vaonis course, the Smart Telescope Processing Guide, and extra downloadables!
ZWO Seestar S50 Pro: Specs and Price
Let's go over the new specs of this smart telescope and the price.
The Seestar S50 Pro is a quadruplet apochromatic telescope with a 50mm aperture and 260mm focal length. It has a focal ratio of f/5.2. It has a 1/1.2" sensor for its telephoto lens with a pixel size of 2.9μm, and a 1/2" sensor for his wide-angle lens. Both have a 2160 x 3840 resolution (4K) with a total of 8.29MP.
The telephoto lens has a field of view of 2.8°, with 63° for the wide-angle lens.

The S50 Pro has built-in Bluetooth and WiFi, a battery life of approximately 9 hours, a built-in electronic focuser, dew heater, and filter wheel. The mount design is alt-az but can also be set up for equatorial mode.
At the time of writing this review, Seestar costs $999 + tax in the United States and is available for purchase at High Point Scientific or on the official ZWO website. It costs 999 € in Europe.
Size, Weight & Setup of the Seestar S50 Pro
Weight: 6.17 lb (2.8 kg)
Height: 260mm (10.24 in)
Width: 145mm (5.70 in)
Depth: 140mm (5.51 in)

The Seestar S50 Pro is only slightly larger and heavier than the non-pro version. It now weighs 6.17 pounds (2.8 kilograms) instead of 5.5 lbs (2.5 kg) and has a size of 10.2 x 5.7 x 5.5 inches (26 x 14.5 x 15 centimeters) when it used to be 10.1 x 5.6 x 5.1 inches (26 x 14 x 13 cm).
Just like before, the S50 Pro is light and small enough to be easily carried anywhere while traveling, especially thanks to the provided padded case.
Controlling the Seestar S50 Pro with your Phone
I've already went through the entire Seestar app in my previous reviews, and cover all the features in depth in the Galactic Course, so I'll keep it short here.
The Seestar app is what you'll be using to control your smart telescope with your phone or tablet. You can also control it from your computer which I also show in the course. With the app, you'll be able to shoot the target of your choice, schedule imaging sessions, edit your images, do mosaics, stack your files, look at other users' photos, and more.
You have 5 main tabs:

Home (Seestar)
The Home tab is also called the Seestar tab. This is your main dashboard with all of the important information visible at a glance. You'll find information on the weather, a quick access to your telescope settings, and see several widgets such as the different imaging modes (Stargazing, Solar System, Scenary) followed by the Album, Planning mode, and Post-Processing mode. Lastly, you have articles, the shop, and tutorial links.
SkyAtlas
Here you'll find a planetarium page where you can look for targets in the night sky. You can also search for specific objects using filters and categories. You are also able to add targets of your choice to your Favorites, and slew to anywhere in the sky using manual coordinates.
Community
The third tab is the community tab, where you can look at other Seestar users' images and share your own. You can follow people, like and comment on their pictures, and message them!
Nearby
The fourth tab is the "nearby" tab, which shows you a map of the entire world with pictures tagged by location taken by Seestar users. This is cool if you want to make some friends who live near you, or if you want to check what other people managed to capture in different light pollution levels.
Me
The last tab is the "Me" tab, which is similar to a profile or instrument page. Here, you can tweak both basic and advanced settings about your telescope, edit your profile, update your firmware, and more.
Most of your time will be spent in the Stargazing mode, which you access from the Home page. This will open up the imaging interface for deep sky objects, and let you shoot the target of your choice! The app is overall really good!
Deep Sky Astrophotography using the Seestar S50 Pro
The first target I decided to image with the S50 Pro was the Andromeda Galaxy, which I had rarely done with smart telescopes in the past. I unfortunately couldn't use EQ Mode as I still needed to buy an adapter for the tripod to allow me to angle the Seestar.
The image below was shot using the regular Alt-Az mode, from my Bortle 5/6 backyard and for a total of 1.5 hours. It was edited within the app with some noise reduction and star reduction applied.

Besides the frustrating orientation of the sensor for this specific target, the galaxy itself looks nice, and so do the stars and background! This is an object that would be better shot using Mosaic mode, to get the entirety of the spiral arms visible. Either way, it is impressive for a first attempt!
I also shot two clusters, M15 and the "Double Cluster in Perseus" which you can see below. These were taken in one hour or less, and look okay. The Double Cluster is off-center, but the stars themselves look nice.
I am currently waiting for clear skies before being able to share images taken with EQ mode, which I expect to look very good!
Our Premium Astrophotography Course
Want to learn all aspects of astrophotography in the most efficient way possible?

The Galactic Course includes a LIFETIME membership that gives you unlimited access to all current and upcoming astrophotography content. Step into an ever-growing realm of knowledge and learn at your own pace. Make life-long friends and connections with other members, and get tips from instructors that truly care about your journey and progress under the night sky.
Planetary, Lunar, and Solar Imaging with Seestar
The first thing I did with my Seestar S50 Pro is to shoot the solar eclipse of August 2026, which was not total in France but still an enjoyable 90% cover.

I decided to make a time-lapse of the event, so I setup the S50 Pro to Solar Mode and launched the time-lapse capture, doing 8-second intervals. The end video was great, although the event disappeared behind a house during the second half. Still, above is a screenshot I took from that time-lapse, which makes for a beautiful image.
Planets, the sun by itself, and the moon, are still on my To-Do list. They will be captured as soon as clear skies come back and placed in this review!
As a reminder, the three pictures below are what I was able to get with the original Seestar S50:
Left: Jupiter - The moons of Jupiter could be seen, but the details on the planet could not.
Center: Sun - The sun looked great, although on that specific day there wasn't much solar activity!
Right: The moon looked pretty decent, although overexposed near the bottom right. I'm 100% sure it will look better this time around.
Seestar S50 Vs. Seestar S50 Pro: Which One is Best for You?
If you're wondering how the Seestar S50 Pro compares to the original Seestar S50, let's look at all the differences now!
They have the same app, are both easy to use and carry around, and of course both share the same design and build. Let's first compare the specifications, then see what features are available on the Pro that aren't on the S50.
Quick Spec Comparison
Spec | Seestar S50 | Seestar S50 Pro |
Price (at launch) | $499 | $999 |
Weight | 2.5 kg (5.5 lb) | 2.8 kg (6.17 lb) |
Telephoto aperture | 50mm, f/5 | 50mm, f/5.2 |
Telephoto focal length | 250mm | 260mm |
Optical Design | 3 elements APO | 4 elements APO |
Resolution | 1920 x 1080 | 3840 x 2160 |
Sensor pixel size | Sony IMX462, 2.9μm pixels | 2.9μm pixels |
Field of View | 1.46° | 2.8° |
Storage | 64GB | 128GB |
Battery | 6,000 mAh (~4-6 hrs) | 10,000 mAh (~9 hrs) |
New Features on the s50 Pro
To make things as clear as possible for you, here are all of the new and/or upgraded features the Seestar S50 Pro has over the original S50.
Wide-Angle Lens with an FOV of 63 degrees.
Milky Way + Star Trails mode
NFC Instant Pairing
Automated Imaging Plans
More Wide-Angle related features (Night sky time-lapses, constellation identification and annotation)
Longer Imaging Sessions (10,000mAh battery for up to 9 hours of imaging. For comparison, every other Seestar telescopes so far had a 6,000mAh battery).
So, Which One Should You Get?
The price of the S50 Pro is almost twice as much as the original S50. The main differences are obviously about the wide-angle lens, as well as the 4K resolution.
Get the original S50 if you don't care much about shooting the Milky Way, star trails, and time-lapses with a smart telescope. These can all be shot with a DSLR/Mirrorless if you own one. Also get the original S50 if you don't plan to print your images or zoom in too much. If you only care about sharing them on social media, you'll barely notice the smaller resolution.
Get the S50 Pro if you want the current best smart telescope from ZWO. You'll have two 4K sensors and be able to shoot pretty much any subject depending on the lens used. Having a higher resolution also means you can print your pics on larger paper or crop more without sacrificing anything. It's also the better long-term investment if you plan to use it for several years.
Get the S30 Pro if you want something more affordable and still have the double lens system with a 4K telephoto lens!
Final Verdict
The Seestar S50 Pro is a nice upgrade from the original S50. The double-lens system and its 4K resolution are truly what makes the biggest difference in my opinion. The price may seem steep if you're used to the previous ZWO smart telescopes, but feels fair when compared to some of the $2,000+ (or sometimes $4,000+) models from other companies.
I'll be adding more pictures to this review once I have a proper streak of clear nights. In the meantime, be sure to go through my full online course about the ZWO Seestar telescopes which will help you get the very best out of your model.
Make sure to follow Galactic Hunter on Facebook, Instagram, and YouTube to stay up to date with everything!
Clear Skies,
Antoine Grelin
Galactic Hunter
GALACTIC HUNTER BOOKS


Comments