


DwarfLab DWARF Mini - An Excellent Extra-Small Smart Telescope - Full review


The Dwarflab DWARF Mini is the smallest, lightest, and most portable of all smart telescopes. It's funny, because I actually started my review of the DWARF 3 by the exact same sentence, but had to edit it out because the Mini is even smaller! Besides his size, the DWARF Mini is also impressive in so many other ways.
In this review, I will tell you how exactly the DWARF Mini impressed me, and compare it head to head with the popular DWARF 3.
If you own a Dwarflab telescope, be sure to check out my premium online course, which will help you completely master your smart telescope with 120+ lessons, videos, and downloadables.
💰 CLICK HERE to automatically apply a coupon on Dwarflab's website for you to save money on your DWARF 3 or DWARF Mini purchase!

Table of Contents:
What's in the box?
Design and Dual Camera
Specs & Price
Size, Weight, and Mounting
How to Set Up the DWARF Mini
Dwarflab App
Deep Sky Objects with the DWARF Mini
Lunar and Solar Astrophotography with the DWARF Mini
Stellar Studio
Final Verdict
DWARF Mini: What's In The Box?
When purchasing the DWARF Mini smart telescope, you will get:
The DWARF Mini Smart Telescope
The Magnetic Solar Filters and its pouch
A USB-C Cable
A Wipe Cloth

A tripod and carrying bag can also be added separately.
The Tripod

The Dwarf Mini is shipped in a small box that doesn't include a tripod by default. This is okay if you already own a tripod at home, because the base of the DWARF Mini can be screwed on to almost any tripod from any brand. If you do not own a tripod, you will need to either purchase one somewhere, or add the official Dwarflab tripod to your cart. This is a great tripod for the price, and it is the one I use on my DWARF 3.
For my DWARF Mini, I use an old tripod I found in my attic!
The Battery
The DWARF Mini has a 7Ah Lithium-Ion battery with an average runtime of 3 to 4 hours (like the DWARF 2). For comparison, the DWARF 3 battery lasts for 4-6 hours.

To charge the DWARF Mini, simply use the included USB-C cable and wait approximately 70 to 95 minutes.
You can see the progress of the charge with the green LED lights above the USB port (4 still lights means fully charged) or check the exact percentage on the Dwarflab app.
If needed, you can image with the DWARF Mini while it's plugged in and charging. You can also use a USB power bank.
DWARF Mini Design and Dual Camera
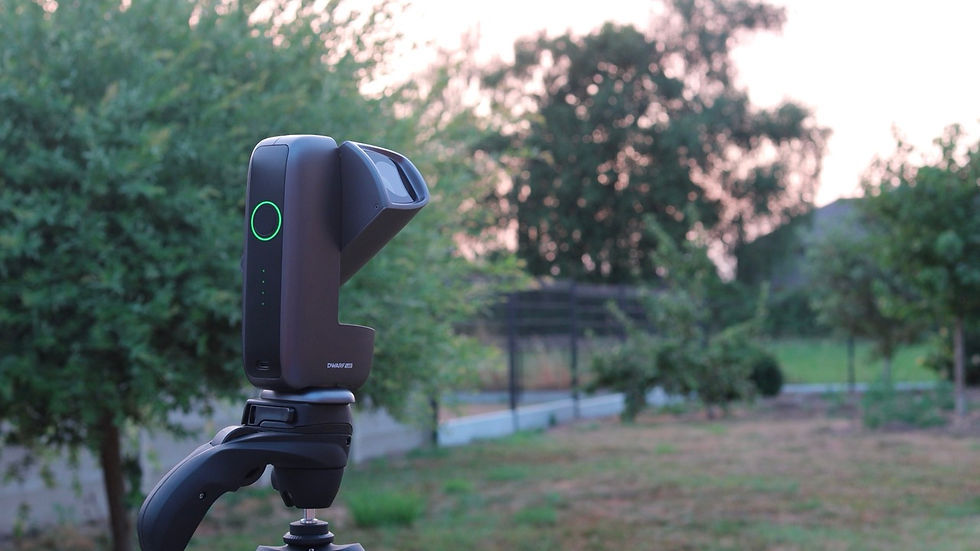
Dwarflab has designed the DWARF Mini differently than their other smart telescopes (the DWARF 2 and DWARF 3). This time, instead of having a rectangular, low to the ground shape with a periscope-like cylinder to host the lenses, the DWARF Mini looks more like a typical smart telescope.
It is longer in height, with an automated arm that opens up towards the sky when in use. The telescope rotates on its base when tracking the sky, which can be set in both alt-az and equatorial. It has one power button, 4 LED lights (useful to know the charge status for example) and one power port.

The double lens system, which made the DWARF telescopes popular, is still here with this new design!
The main lens serves as the telephoto lens, which is used for almost everything you'll be shooting (DSO's, planets, the moon, the sun...), whereas the wide-angle lens is reserved for things like star trails, panoramas, and time-lapses. This secondary lens is visible just above and to the left of the telephoto lens.
Get the Dwarflab Premium Online Course!
Own a DWARF or planning to get one soon? Get the DWARF Smart Telescope Mastery course and fully master your smart telescope with 120+ lessons (text, videos with commentary, downloadables...). The course is available with closed captions in four languages, and goes through every single aspect of the DWARF 3 + DWARF Mini so that you can get your best pictures ever.

You can also get the Smart Telescopes Mastery Bundle, which includes not only the DWARF course, but also, the Unistellar Telescope course, the Vaonis course, the ZWO Seestar course, the Smart Telescope Processing Guide, and extra downloadables!
The Filters
The DWARF Mini has two built-in filters and one physical filter.
The filters are:
The Astro Filter (Built-in)
This is a light pollution filter, better known as CLS filter.
Wavelength covered: 430-690nm
The Duo-band filter (Built-in)
This is a dual narrowband filter which should be used when shooting emission nebulae.
Wavelength covered: 656.3nm (HA) and 500.7nm (OIII)
The Solar filter (Physical)
This is a magnetic filter that will protect your lens from the Sun when pointing directly at it.

On top of that, a dark filter is also built-in, which helps the DWARF takes calibration frames.
As always, the Dwarflab app will help you pick the best filter depending on what target you are shooting. This means that if you are a complete beginner, you do not have to worry too much about this!
DWARF Mini: Specs and Price
Let's cover the specifications of the DWARF Mini and see how much it costs.
The main sensor in the DWARF Mini smart telescope is the Sony IMX662, which has a pixel size of 2.9µm and a native resolution of 2.1 Megapixels. The telescope lens is multi-coated with ED glass elements, it has an aperture of 30mm, a focal length of 150mm, and a focal ratio of f/5.
Like I said earlier, it has two different lenses. The field of view for the telephoto lens is 3.5°, while the one for the secondary lens is 50°.

The DWARF Mini can be connected to via Bluetooth or WiFi, and can save pictures as JPEG, FITS, TIFF. Files can be transferred to your computer wirelessly or through the USB-C cable.
At the time of writing this review, the DWARF Mini costs $399+ tax in the United States and costs 409 € in Europe.
Size, Weight & Setup of the DWARF Mini
Weight: 0.82 kg (1.8 lbs)
Height: 18 cm
Length: 11 cm
Width: 5.5 cm
The DWARF Mini is smaller than the DWARF 2 and DWARF 3 telescopes. It's longer in height, but much smaller in width! You truly can take it anywhere with you, it will fit in any backpack, and will even fit in your pocket. Barely, but it will.
How to set up the DWARF Mini?
It takes only a few seconds to set up the DWARF Mini. Do the following:
Place the tripod on the ground and make sure it is level.
Attach the base of the tripod to the bottom of the DWARF.
Attach the telescope to the tripod.
Press the power button on the side once to turn the telescope on.
You can then connect to the DWARF using the Dwarflab App on your phone!
Controlling the DWARF Mini with your Phone
I've already talked about the excellent Dwarflab app several times in past reviews, and go through all of the features in depth in the Galactic Course, so I'll keep it short here.
The Dwarflab app lets you do a ton of things with your smart telescope, like scheduling a sequence so that you can image while sleeping, use your home WiFi to control your DWARF, use Stellar Studio to edit your pictures from the app, stack your files from several nights, do mosaics, and more.
You have 5 main tabs:
Home
Here you connect to your DWARF, enter the imaging mode, and more.
Atlas
This is similar to a planetarium program (think of Stellarium or SkySafari) where you can zoom in on targets, see where they are in the sky in real time, etc.
Explore
This is the community tab of the Dwarflab app, where you can share your picture, cooperate with other people, and peruse through all images by other users!
Album
Your gallery of images and videos are all here! This is from here that you can access Megastack, Stellar Studio, etc.
Me
The last main tab of the app is the Settings tab. Here you'll have access to all of the main settings for the app and telescope, as well as advanced settings which you can see in the next lesson!

The main imaging interface is accessed from the home tab. It can be a bit scary at first due to all the buttons, but it's constantly being updated and simplified, to the point where it now feels much less overwhelming than it used to! You can see the current version above, and the previous ones in my DWARF 2 and DWARF 3 reviews if you are curious.
Deep Sky Astrophotography with the DWARF Mini Smart Telescope
The DWARF Mini is very simple to set up in EQ mode, so this is the tracking mode I use for all my shots. This allows me to increase the exposure time to 60 seconds, instead of the default 10 seconds. That helps with signal to noise ratio, meaning the images come out cleaner and brighter.
Below you can see an example of a nebula shot with the DWARF Mini in a single night using EQ mode. This is the Crescent Nebula in Cygnus, which is full of HA in and around it. Because of all that nebulosity, the duoband filter is ideal for this target.

The image was edited within the app using Stellar Studio. A star reduction was done, followed by the star spikes addition. Note that the star reduction is what truly transforms the image, as it also seems to increase saturation and clean up the overall image.
Below are some extra pictures taken with the DWARF Mini. Note that these are only 1-2 hours worth of integration time!
Wizard Nebula with the DWARF Mini M92 Cluster with the DWARF Mini Heart Nebula with the DWARF Mini
Planetary, Lunar, and Solar Imaging with the DWARF Mini
After deep sky objects, let's now try the DWARF Mini on the moon and the sun! I did not bother on planets this time because it would for sure not be worth it. This is a fact considering the planets look unimpressive with the DWARF 3, which has better specs for such target than the DWARF Mini.
The Moon using the DWARF Mini

The attached image is a stack of 10 images (all done automatically within the app) of the Moon.
It looks good, although not very impressive detail-wise. A higher stack (25 or 50) could improve the details slightly, but the resolution is what limits the telescope when it comes to solar system photography. It's still fun and extremely easy to image the moon though.
The Sun Using the DWARF Mini

Important: Make sure the solar filter is attached on your lens before slewing to the sun! Without it, you risk damaging the telescope.
This is once again a stack of 10 frames on the sun done through the app. Similarly to the moon, the overall image looks good! When zooming in though, of course the resolution starts to show some issues. For Instagram or other social media that is viewed on a phone screen, that's just fine!
Stellar Studio
A built-in processing suite is available in the Dwarflab app, and it's surprisingly very good. As of writing this review, you have buttons to improve your image (there were just 4 when writing the DWARF 3 review).

The six editing options are:
Standard
This opens up a a few options like an "Auto" edit, star correction, or denoise.
Star Reduction
This will make the size of your stars smaller.
Spikes
This will add diffraction spikes to your stars.
Star Removal
This will remove all of the stars to give you a starless version of your image.
Stars Only
This will extract the stars from your image and keep the star mask.
Watermark
This is if you want to add a watermark to protect your images.

You can also, if you prefer, process your picture on your computer. For this, you'll just need to plug in the DWARF Mini to your computer using the USB-C cable, and transfer your Master file.
DWARF Mini vs. DWARF 3: Which One is Best for You?
If you're wondering how the DWARF mini compares against the slightly larger DWARF 3, let's tackle this right now!
I spent months with both. They have the same app, the same ease of use, almost the same size, and overall the same DNA. The first thing I want to say is simple: You can't go wrong with either! Now, let's look at the actual differences between the two.
Quick Spec Comparison
Spec | DWARF Mini | DWARF 3 |
Price | $399 | $549 |
Weight | 840 g (1.85 lb) | 1.3 kg (2.87 lb) |
Telephoto aperture | 30mm, f/5 | 35mm, f/4.3 |
Telephoto focal length | 150mm (1016mm equivalent) | 150mm (737mm equivalent) |
Sensor | Sony IMX662, 2.9μm pixels, ~2MP / 1080p | Sony IMX678 STARVIS 2, 2μm pixels, 8.3MP / 4K |
Max single exposure | 90 seconds | 60 seconds |
Storage | 64GB | 128GB |
Battery | 7,000 mAh (~4 hrs) | 10,000 mAh (~4 hrs) |
Weather resistance | Not rated | IP54 |
Mount modes | Alt-Az / EQ | Alt-Az / EQ |
Where the Mini Wins
The DWARF Mini is almost half the weight of the DWARF 3, and is smaller as well. This is something you might not care about (if you image from your backyard all the time) or be a huge deal (for example if you travel or hike a lot).
The Mini has a sensor with larger pixels (2.9μm vs. 2μm on the DWARF 3). This means a slightly cleaner and lower-noise signal per pixel. In my tests, the targets, before any processing, looked -very slightly- more impressive and bright than the exact same picture taken with the DWARF 3 at the same time.
Lastly, of course, the Mini is cheaper ($399 Vs. $549) so you save about $150 with the Mini, which you can use to buy a tripod, which is not included on either.
Where the DWARF 3 Wins
The DWARF 3 is better when you start imaging more seriously.
It's larger aperture means better details especially on galaxies and intricate nebulae. It's 8.3MP / 4K sensor means you can crop more and print on larger paper without it looking blurry or messy. For comparison, the Mini has 2MP and is stuck at 1080p. This is perfect for sharing your images on social media or print them on small paper, but zooming in or printing large will sometimes not look pretty.
The DWARF 3 has double the storage (128GB vs. 64GB) so you won't need to format or remove files as often.

So, Which One Should You Get?
Get the DWARF Mini if you're new to astrophotography, want the lowest possible price to get started, and enjoy the portability. It's honestly a amazing first smart telescope.
Get the DWARF 3 if you want the better image quality and resolution despite the higher price. It's also the better long-term investment if you plan to use it for several years.
But like I said, the differences between the two aren't huge enough to make them too differnet. Both are great smart telescopes.
Final Verdict
The DWARF Mini is an impressive smart telescope considering its low price and its tiny size. You can take the scope anywhere and shoot whatever you want using either the telephoto or the wide angle lens. I did not talk about star trails, panorama, videos or time-lapses in this review as I've already done so in the past and the process is identical, but the DWARF Mini can also do it all!
Be sure to go through my full online course about the DWARF Mini which will help you get the very best out of the telescope.
The DWARF Mini is a more affordable version of the DWARF 3, and it's almost just as good depending on what you shoot.
DWARF Telescope Coupon
Dwarflab was able to share a coupon for the Galactic Course members, which I can share with you as well for this review! You can CLICK HERE to have a coupon automatically applied in your cart for either the DWARF 3 or the DWARF Mini!
If you already own one and have taken some great images with it, attach them to the comments section of this post so we can all see your work!
If smart telescopes are not the right product for you, but you are motivated to start Astrophotography, check out our complete guide on beginner astrophotography equipment!
Clear Skies,
Antoine Grelin | Galactic Hunter


Comments